Adobe Fireworks CS5 - Measure tool
Do you work on user interfaces? Ever make specifications that call out specific pixel measurements? Select the Measure tool from the Vector group in the Toolbox (nested under the Rectangle tool [U]), and use it to create your call outs.
Test renderings with selections
Sometimes you may want to quickly render for only a selected part of your 3D object to save time and check for specific lighting effects. That's now possible by simply making a selection on the area you want to render, and going to 3D>Progressive Render Selection.
Five Quick Tips for Multi-State Objects (MSOs)
Multi-state objects are one of the most useful tools for adding interactivity to documents you want to publish to the iPad and other mobile devices. With them you can create slideshows and other cool interactive content.
Here’s five quick tips for working with multi-state objects (MSOs) in InDesign.
When you convert regular objects into multi-state objects, it’s like you wrapped a special interactive container around the objects.
Here’s five quick tips for working with multi-state objects (MSOs) in InDesign.
When you convert regular objects into multi-state objects, it’s like you wrapped a special interactive container around the objects.
9-slice scaling in Adobe Illustrator CS5
CS3 brought a feature called 9-slice scaling from Flash Professional into Illustrator. At that time, 9-slice was only really useful for Illustrator symbols after importing them into Flash. Now, in CS5, 9-slice works on the scaling of any symbol right inside Illustrator. Let's say you want to make a button with text on it, but when you scale it up, you don't want the text to stretch or the rounded corners to distort. Make the button into a symbol (drag it into the Symbols panel) and apply 9-slice scaling (select Enable Guides for 9-Slice Scaling in the Symbol Options dialog), then you can scale the button without distortion.
Gmail Gets A Swanky New Inbox And Automatic Sorting To Help Fight Information Overload

Google today is introducing a new way to manage your Gmail inbox. This new view of your inbox puts a number of tabs at the top of Gmail’s inbox column. By default, Google shows tabs – and automatically categorizes your messages into them – for your social updates from sites like Google+, Twitter, Facebook or YouTube, promotions from the likes of Google Offers and Groupon, and a kind of catch-all “Updates” tab for your bills, receipts and similar messages.
Speed up your InDesign layouts

We simplifies object selection and frame editing with InDesign’s easy-to-use Gap tool and Live Corner Effects
How to open .pages files on a computer without iWork
Here’s a problem I’ve encountered at work a few times: You are given a .pages file, but can’t open it because you don’t have iWork’s Pages installed.
What is iWork or Pages?
Apple’s Pages application is part of the iWork software suite for Mac. It is meant to compete with Microsoft Office Word. Pages can open word “.docx or .doc” files, but Word can’t open Pages’ “.pages” files.
How to work around this problem:
Luckily, a PDF of each document is embedded within the file, and we can extract that PDF file with a little work.
Moderating a presentation with multiple speakers
There are times when you have to share the spotlight with one or more fellow presenters. If it falls to you to act as moderator, here are a few points to keep in mind:
- Plan a general outline for the presentation and alert each presenter of your need to do so. This will push people to prepare their content early and do a more thorough job.
- Ask each presenter for some biographical information. If you need to warm up the audience or introduce each person before they present, a little background can be very helpful.
- Correspond with the other presenters well ahead of time and always provide ample ways to contact you. In addition, make sure you ask for multiple contact routes to stay in touch with presenters.
- Ask that each presenter consider a list of at least three questions that audience members are likely to have. Putting oneself in the place of the audience can help foster more stimulating discussion and structure a more useful presentation.
- Make each presenter well aware of the amount of time they can use for their show, and establish a signal for where time is almost up, and when they need to finish.
- Give some coaching as to the format of the question and answer part of the show: whether questions may be addressed before the next speaker, how many may be answered, and whether other speakers may chime in.
Creating your own formatting style
If you've ever wanted to create a formatting style that's different than any of the currently available styles, you'll be glad to know that there's an easy way to do it. First, select the cell that has the combination of formats that you want to include in the new style. Then, choose Style from the Format menu and in the Style name box, type a name for the new style. To define and apply the style to the selected cells, click OK. To define the style without applying it, click Add, and then click Close. Also, if no cells have the formats you want for the style, you can specify the formats when you name the style.
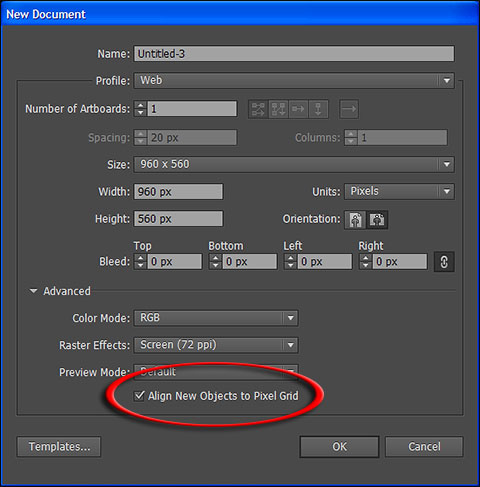
When, Why and How to Align All Objects to Pixel Grid in Adobe Illustrator
By default when creating new document for Web in Adobe Illustrator option Align to Pixel Grid is checked what you can see in bottom Advanced portion of New Document window.
New Document window in Adobe Illustrator
New Document window in Adobe Illustrator
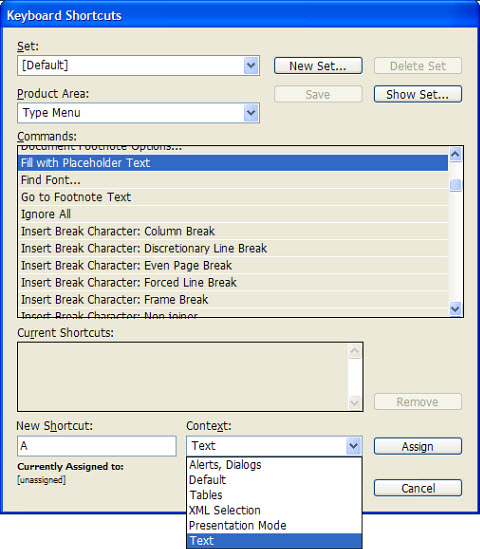
Advanced Keyboard Shortcuts in InDesign – Context Menu
Context menu in InDesign Keyboard Shortcuts dialog
In Indesign you can assign keyboard shortcut to any command available in menus and thats nothing new and exciting because most of softwares have that option, but did you realize Context menu in Kayboard Shortcuts dialog? This pop-up menu can be incredible useful because you can assign any keyboard shortcut even and default shortcut for specific editing like text editing without conflict.
 P
P
In Indesign you can assign keyboard shortcut to any command available in menus and thats nothing new and exciting because most of softwares have that option, but did you realize Context menu in Kayboard Shortcuts dialog? This pop-up menu can be incredible useful because you can assign any keyboard shortcut even and default shortcut for specific editing like text editing without conflict.
 P
PWhat you should know before placing images in Photoshop and Illustrator
Photoshop and Illustrator resample images to match document intent. You should know how it works before placing them into those applications. Both applications will upsample or downsample images as we do in Image Size dialog when Resample Image option is turned on. So, Resolution and Pixel Dimensions will change while Document Size (physical dimension) will remain the same. Also you should pay attention whether image have Camera raw settings applied to it and I will show you in example why.


Creating cool image effects using Compound Path in InDesign
You probably know how to place image in InDesign, that’s routine and can be done in several different ways. I will skip placing image and proceed to some cool things you can do using compound path.
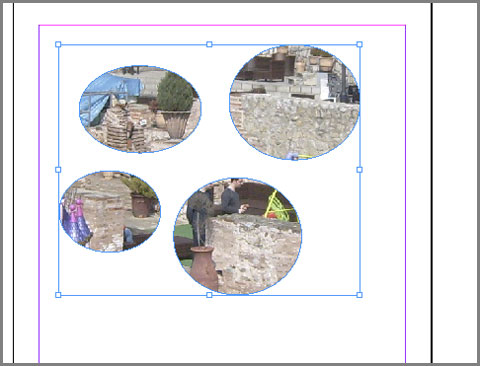
Cool image effect using Compound Path in InDesign
Cool image effect using Compound Path in InDesign
Moderating a presentation with multiple speakers
There are times when you have to share the spotlight with one or more fellow presenters. If it falls to you to act as moderator, here are a few points to keep in mind:
- Plan a general outline for the presentation and alert each presenter of your need to do so. This will push people to prepare their content early and do a more thorough job.
- Ask each presenter for some biographical information. If you need to warm up the audience or introduce each person before they present, a little background can be very helpful.
- Correspond with the other presenters well ahead of time and always provide ample ways to contact you. In addition, make sure you ask for multiple contact routes to stay in touch with presenters.
- Ask that each presenter consider a list of at least three questions that audience members are likely to have. Putting oneself in the place of the audience can help foster more stimulating discussion and structure a more useful presentation.
- Make each presenter well aware of the amount of time they can use for their show, and establish a signal for where time is almost up, and when they need to finish.
- Give some coaching as to the format of the question and answer part of the show: whether questions may be addressed before the next speaker, how many may be answered, and whether other speakers may chime in.
Creating your own formatting style
If you've ever wanted to create a formatting style that's different than any of the currently available styles, you'll be glad to know that there's an easy way to do it. First, select the cell that has the combination of formats that you want to include in the new style. Then, choose Style from the Format menu and in the Style name box, type a name for the new style. To define and apply the style to the selected cells, click OK. To define the style without applying it, click Add, and then click Close. Also, if no cells have the formats you want for the style, you can specify the formats when you name the style.
Adobe InDesign CS5 - Live distribute
Ever needed to change the amount of space between a number of aligned items on the page? To do it interactively, first select the items on the page with the Selection tool (notice that CS5 now provides a transformation bounding box around multiple selected items!) Click-and-drag one of the handles of the bounding box to resize all the items in your selection. To resize the space between each item, hold down the Spacebar while dragging.
Halting Hyphenation Without Forced Line Breaks
We've all done it: pressed shift+enter/return to stop a word from hyphenating. It's quick and easy, but it's sort of like sweeping dirt under the rug. You've solved one problem but created another. If you re-use that text either with different formatting, or in a different output a forced line break will almost always crop up in a very inopportune spot. Fortunately, there are plenty of better alternatives to stop a word from hyphenating, like these from Jean-Claude Tremblay:
1) Select the word and apply a No Break character attribute
2) Select the word and apply the No Language character attribute
3) Add a Discretionary Hyphen in front of the word (Type > Insert Special Character > Hyphens and Dashes > Discretionary Hyphen).
4) Add the word with a tilde (~) in front of it in the user dictionary
5) Use a paragraph GREP style to search the word and apply either method 1 or 2 as a character style.
Cleaning Out Old Hyperlinks in InDesign
Looking for a good InDesign New Year's resolution? How about cleaning out your Hyperlinks panel and getting rid of all the old hyperlink destinations that may be cluttering up your documents and slowing you down? Just follow these steps from a recent InQuestion column by Sandee Cohen.
1) Choose Hyperlink Destination Options from the Hyperlinks panel menu.
2) Click the Edit button in the dialog box. If you have a very long list of destinations, there might be a long pause.
3) Use the Destination menu to move through your destinations to delete the ones you don’t want, or click the Delete All button to clear the list completely.
Bonus tip: You can also use the Hyperlink Destination Options dialog box toedit your destinations. So if a client changes his URL link, you don’t have to re-create all the hyperlinks in the document—just change the destination setting.
Mask an image with another image
InDesign doesn't have a specific Mask command, but you can still combine two images to create unique graphics. The secret is in the Clipping Path command. You can't actually use clipping paths to mask images in InDesign, but you can use paths created in InDesign or embedded alpha channels created in an image-editing application. The Clipping Path command allows you to both create and control these types of paths.
To mask an image with an InDesign path, place the image you plan to use as a mask into your document. Next, select Clipping Path from the Object menu to display the Clipping Path dialog box. Choose Detect Edges from the Type pop-up menu. Then, click OK. Finally, click on the image with the Direct Selection tool and use the Place command to import the second image into the selected path.
To mask an image with the alpha channel of another image, select the Show Import Options check box as you place the image you plan to use as a mask and click Open. In the resulting dialog box, choose the embedded channel from the Alpha Channel pop-up menu. Click OK and click the loaded icon on the page to import the file into your document. Now, while the object is selected, choose Clipping Path from the Object menu. In the Clipping Path dialog box, select Alpha Channel from the Type pop-up menu and select the embedded alpha channel from the Alpha pop-up menu. Then, click OK. Finally, select the image with the Direct Selection tool and place the second image into the selected path.
Run your text along a path (Photoshop CS)
Did you know that Photoshop CS allows you to run text along a path? Well, it does! Just create a path using the Pen tool. Then, select the Horizontal Type tool and click the insertion point on the path where you want your text to start. Finally, just type away.
Spice up your transitions
When you make changes to the location, opacity, rotation, or size of your components, Flash Catalyst captures those changes across states and automatically creates transitions. In addition to these automatically created effects, you can create your own directly on the Timeline. By selecting an object, you can use a number of 3D rotation effects, set a number of component properties, and choreograph custom component transitions.
Custom code hinting for PHP
With all the new dynamic design features for PHP-based applications in Dreamweaver CS5, you might think we forgot about the hand-coding pro. Not the case at all. Go to Site>Site-Specific Code Hints, and if you're using Drupal, WordPress, or Joomla!, Dreamweaver will pre-configure your code hinting to pull in all the right include files, directories, and code definitions.
Adobe Illustrator CS5 - Back to basics
If you've applied fancy attributes like art or pattern brushes, or even variable width to strokes, but you want to reset them to simple strokes, a new setting in the Stroke panel (also accessible from the Control and Appearance panels) is made for doing just that. [Editor's note-we can't find this feature]
Contextual paragraph styles
I want not to have to make multiple nearly-identical paragraph styles with minor variations, and I want not have to go back and reapply them every time text reflows.
Example: If I have a different paragraph style if the text falls at the top of a column-- let's say it gets a RULE ABOVE that the rest of the text doesn't get--I want either to be able to toggle between the two styles automatically OR to have a toggle within the paragraph style that says "Use this RULE ABOVE if and only if at top of column."
Example: If I have a different paragraph style if the text falls at the top of a column-- let's say it gets a RULE ABOVE that the rest of the text doesn't get--I want either to be able to toggle between the two styles automatically OR to have a toggle within the paragraph style that says "Use this RULE ABOVE if and only if at top of column."
Skip page numbering for certain documents within a book
One of the benefits of including multiple documents in a book file is the automatic numbering feature. However, many of my documents have a divider page at the beginning of each chapter/section that I don't want to include in the page numbering. Also, I want each chapter to begin on a right hand page, but don't want the blank pages counted in my page numbering--particularly when I have a strict page limitation on my final document.
Currently, the only way to avoid including a document or a specific page in the automatic page numbering is to manually set the page numbering--which completely obviates the point behind automatic page numbering in the first place.
Currently, the only way to avoid including a document or a specific page in the automatic page numbering is to manually set the page numbering--which completely obviates the point behind automatic page numbering in the first place.
Eleven Tricks That Will Help Your Workflow in InDesign
1. InDesign the Calculator
Within the Control or Transform Palette it is possible to calculate and resize objects. The control palette can be found by going to Window > Control, and the Transform palette is found under Window > Object & Layout > Transform. Simply use your number keyboard as you would when using a calculator. For example, to double size of a frame, select the frame and in the width or height option input 55*2 > and hit enter. This will size the frame at 110mm. Remember to active "Constrain Proportions for scaling" option if you require scaling.
Within the Control or Transform Palette it is possible to calculate and resize objects. The control palette can be found by going to Window > Control, and the Transform palette is found under Window > Object & Layout > Transform. Simply use your number keyboard as you would when using a calculator. For example, to double size of a frame, select the frame and in the width or height option input 55*2 > and hit enter. This will size the frame at 110mm. Remember to active "Constrain Proportions for scaling" option if you require scaling.
Adobe Flash Professional CS5 - Controlling bone movement
Working with a complicated IK armature and want to move just one section? No problem. Just hold down the Shift key while dragging any bone to limit the movement to just that bone and its children. This comes in handy, for example, if you only want to move the arm in the armature of a person.
Ease troubleshooting by setting what happens in case of a switchport violation
For security, you may want to limit the number of computers that can be connected to a given portion of the network. If there are too many, this may indicate that there are connections that don't belong there. Accordingly, the following command limits the number of MAC addresses that can be connected to a given interface (for example, in this case it limits the port to 10 addresses):
switchport port-security maximum 10
However, if you don't configure something to happen if that limit is reached, then by default the port will just shut down. This can be a good security practice for ultimate lockdown; however, if you need to troubleshoot why the maximum is being reached, then it's helpful to specify what should happen when that happens, which you can do with the following command:
switchport port-security violation restrict
There are actually three options you can use at the end of this command to specify what should happen in case of a violation:
protect - This ignores traffic until the violation condition goes away.
restrict - This is the same as "protect" except that it sends an SNMP trap, so you can know what's happening and when.
shutdown (the default) - This causes the port to shut down completely.
For troubleshooting or figuring out what the proper configurations should be, use the "restrict" option, as it gives you the most information.
A fallback for website security problems
Alongside your various security monitoring mechanisms, you may want to do a periodic Google search of your website. While monitoring your site in search results is often important from an SEO perspective, it can also warn you about security problems.
If your site is hacked, Google's listing for one or more pages may contain the words "This site may harm your computer." When that happens, Google will try to contact you by email but may not be able to reach you.
As a more fail-safe method, tt's possible to write a program or use any of a number of a search engine "scrapers" to automatically search your site and notify you if the string "This site may harm your computer" shows up. This lets you know about the problem and correct it immediately, before most customers notice.
Adobe Premiere Pro CS5 - Extended edit
The Extend Edit feature consists of two commands called Roll Next Edit to CTI and Roll Previous Edit to CTI. They allow you to extend the duration of each clip on a targeted track to the playhead (CTI) position. If there's not enough media to extend to the CTI, the clip is extended to the media available. These commands are only available as keyboard shortcuts, and can be assigned shortcuts from the Edit>Keyboard Customization menu.
Painting photographs
Photoshop CS5 enjoys a new paint engine wired up to the new Mixer Brush tool (nested with the Brush tool [B]). To enjoy the benefits, select the new Painting Workspace (Window>Workspace>Painting) and the Mixer Brush tool. Open a conventional photo and have fun experimenting. With more control of brush and fluid dynamics and the ability to mix pixels and to change load, flow, etc., you'll soon be converting photos to paintings. Here I've preserved the photo of my son Miles, while painting over the fall leaves around him.
Search, and you shall find
The Project, Timeline, and Effects & Presets panels each contain search fields that you can use to filter items in the panel. There's also a Search Help field in the upper-right corner of the Application Bar, which uses the Adobe Community Help search engine to search online resources most relevant to the application. This search includes Adobe Help documents, technical support documents, forums, and tutorials and articles on other trusted websites-such as the Layers magazine website.
TOC Bookmarks, without the TOC
One of the coolest things about InDesign's Table of Contents feature is that it can create PDF bookmarks for each TOC entry. Simply choose Create PDF Bookmarks in the Options section of the Table of Contents dialog box.
But what if you wanted those bookmarks, but not the TOC itself in your PDF? No problem, just create the TOC on the last page of your InDesign document, and don't include that page when you export to PDF. You still get the bookmarks, but no TOC. You could also export the entire document and then delete the last page in Adobe Acrobat.
Also, don't forget that as soon as you create the TOC, the bookmarks will appear in the Bookmarks panel, where you can rearrange them, rename them, add or delete bookmarks, etc before exporting to PDF.
Fire away with Fireworks
Adobe Fireworks CS5 users have a unique workflow to get their designs into Flash Catalyst. When finished with your project, export your design as FXG. Fireworks pages will convert to Flash Catalyst application pages, including master page layer objects. Best yet, if you want to tweak the export engine, it's entirely written in JSF, the JavaScript plug-in language for Fireworks.
Live View navigation tricks
Using a dynamic app such as WordPress or Joomla? You probably find yourself jumping back and forth from Dreamweaver to the admin console in a browser. In Dreamweaver CS5, you can use Live View navigation to make that easier. Create a new, blank document window (or tab), and turn on Live View. Enter your server console's URL into the location bar, and load it in Dreamweaver. Choose View>Live View Options>Follow Links Continuously to turn on navigation full-time, and you've got yourself a console tab you can switch to at any point in time.
Five Guide Tips for InDesign user
1. Double-click the spot on the ruler where you want to add a guide.
2. While dragging a guide, hold the Shift key to have the guide snap to tick marks on the ruler.
3. Hold the Option/Alt key and drag an existing guide to make a copy of it.
4. When you're dragging a new guide from a ruler, you can change it from horizontal to vertical (or vice versa) by holding Option/Alt.
5. To create a page guide that extends to the edges of a page, drag a guide from the ruler and release the guide over the page. To create a spread guide that extends to the edges of the pasteboard, drag a guide from the ruler and release the guide over the pasteboard (or hold the Command/Ctrl key while you release the guide.
Launch hyperlinked files faster during your presentation
When you click on a hyperlink during a presentation, sometimes you feel like the file's host program takes forever to launch. You should prepare for this wait and have material to stall with so that there's no awkward silence. But there's also another remedy to the situation. Prior to the start of the slideshow, open the host application of the file that you have hyperlinked on one of your slides, such as QuickTime. Then when it's time to launch the file or movie, the lag time is greatly reduced and your presentation appears more seamless.
Locking fields in a document
When you update a field in a document, you tell Word to follow the instructions in the field and produce a new result. For instance, if you insert a DATE field into a memo template, you'll no longer need to type the date when you create a new memo--you can just update the field to return the current date.
If necessary, however, you can lock a field to keep Word from updating it. Just place the insertion point marker in the field you want to lock and press [Ctrl][F11]. While locking a field can be convenient, keep in mind that locked fields don't look any different from unlocked fields. The only way to tell whether a field is locked is to select it and press [F9] to update the field. If the field is locked, Word won't update it. To unlock a field, place the insertion point marker in the field and press [Ctrl][Shift][F11].
If necessary, however, you can lock a field to keep Word from updating it. Just place the insertion point marker in the field you want to lock and press [Ctrl][F11]. While locking a field can be convenient, keep in mind that locked fields don't look any different from unlocked fields. The only way to tell whether a field is locked is to select it and press [F9] to update the field. If the field is locked, Word won't update it. To unlock a field, place the insertion point marker in the field and press [Ctrl][Shift][F11].
Save your custom tool settings as presets
Yes, there are two ways you can custom-set Photoshop tools. One option is to set the tool options while no documents are open. This changes the tool settings for all subsequent documents until you reset the tool defaults. Another option is to create custom tool presets. This allows you save multiple settings, as well as share them with other Photoshop users.
To create a custom tool preset:
To create a custom tool preset:
- Launch Photoshop and choose Window > Tool Presets to display the Tool Presets panel.
- Select the tool you want to customize from the Tools panel.
- Set your tool's options on the tool options bar as you like.
- Choose New Tool Preset from the Tool Presets panel's pop-up menu.
- In the resulting dialog box, give your tool a descriptive name and, depending on your preference, select or deselect the Include Color check box. Click OK.
Now, the next time you need to use that tool with those settings, all you have to do is select it from the Tool Presets paenl or the Tool Preset picker, which you access via the tool options bar.
Progressive rendering-pause and resume
If you've paused your rendering (by pressing the Spacebar) and would like it to resume, select the Resume Progressive Render command from the 3D panel's flyout menu. When the rendering is complete, you'll no longer see the blue tiles getting drawn.
A handy ASA diagnostic command for dropped packets
If you're experiencing seemingly random problems on you network, such as dropped VoIP calls and voice quality issues, you may wonder if your ASA, router, or modem are being overwhelmed by the traffic.
In this case, one handy diagnostic tool is the "show asp drop" command. This tells you if your ASA is dropping packets, how many, and information about why.
A more technical use for WebEx
Many people think of WebEx as a meeting and collaboration tool. But you can also utilize it to see and control a user's screen to solve technical problems (similar to using LogMeIn or Microsoft's Remote Assistance). So if your company is already hosting meetings with WebEx, you might consider also employing it to troubleshoot user issues. Note that WebEx is now available on Android devices, as well as iPad and iPhone.
Adobe InDesign CS5 - Rounded Corners
Select a frame and click on the yellow square icon located on the frame edge to enter Live Corner Edit mode. (You can also press the number four key on your keyboard.) You'll now see four yellow diamonds in each corner. Click-and-drag one of the diamonds to adjust the corner radius of all four corners at the same time. To adjust only one corner, hold down the Shift key as you drag the diamond. To cycle through the six different corner styles, Option-click (PC: Alt-click) on one of the yellow diamonds. To exit Live Corner Edit mode, either press the four key again, or deselect the object.
Type on Text Outlines in InDesign
You can create fun type effects by converting letters to outlines and then adding text to those outlines with the Type on a Path tool.
Start with a large letter in a basic sans serif font.
With the text frame selected, press Command+Shift+O/Ctrl+Shift+O to convert the letter to outlines.
Press the forward slash key (/) to remove the fill color. Then press Shift+T to switch to the Type on a Path tool, and click on the letter outline where you want the text to start.
Type the text and use spaces, kerning, and tracking controls to adjust the position of words as desired.
If you want to use a letter composed of more than one path, (like a letter O) you have to release the compound path after converting to outlines (choose Object > Paths > Release Compound Path). Then you can add text to each path using the Type on a Path tool.
Finger Dancing
Manipulating objects is something you probably do dozens of times a day. Learn these keyboard shortcuts to amplify your productivity.
Option-arrow key (PC: Alt-arrow key) to duplicate the current selection
Arrow key to nudge the current selection 1 pixel
Shift-arrow key to nudge the current selection 10 pixels
With any tool selected, press-and-hold the Command (PC: Ctrl) key to toggle temporarily to the Pointer tool
Command-Up/Down Arrow (PC: Ctrl-Up/Down Arrow) will move the selected object's layer(s) in the layer order
Command-Shift-Up Arrow (PC: Ctrl-Shift-Up Arrow) will move the selected object's layer(s) to the top of the layer order
Command-Shift-Down Arrow (PC: Ctrl-Shift-Down Arrow) will move the selected object's layer(s) to the bottom of the layer order
Command-Shift-9 (PC: Ctrl-Shift-9) will rotate the selection 90° clockwise
Copy, then select something else and press Command-Option-Shift-V (PC: Ctrl-Alt-Shift-V) to Paste Attributes
Hold the Shift key when using the Pointer tool or Subselection tool and hover the mouse between guides to see measurements
Shift-drag a guide to see measurements from edges or from other guides
Eight time-saving Excel shortcuts
Excel has lots of useful shortcut keys that perform various actions. The more you know, the more time you can save. Here are seven shortcuts we hope you find useful:
To enter the current date into the active cell, press [Ctrl];.
To enter the current time, press [Ctrl][Shift];.
To enter or edit a cell comment in the active cell, press [Shift][F2].
To quickly copy an entry into a cell directly to the right, select that cell, then press [Ctrl]R.
To quickly copy an entry into a cell directly below it, select that cell, then press [Ctrl]D.
To copy an entry from a cell directly above the active cell, you can press [Ctrl]'. If the entry is a formula, this shortcut makes an identical copy of that formula, rather than adjusting the cell reference relatively.
Pressing [Ctrl][Shift]' also copies an entry from the cell directly above the active cell. However, if the entry is a formula, this shortcut copies the result of the formula only rather than the formula itself.
An easy way to view all formulas in a worksheet without having to select the cell containing it is to press [Ctrl]~. Press the shortcut again to switch back to the normal view.
Recover unsaved workbooks
We've all done it before—either you forget to save a workbook, you accidentally save it when you should have saved it as a different name, or maybe you lose work because of that rare power outage.
Whatever the cause, there's no need to panic when you think you've lost your work in Excel 2010. You can quickly and easily recover older (unsaved) versions of your workbook.
Excel 2010 saves your unsaved versions of files in a specific folder on your hard drive.
Remember that these are new, unsaved files or temporary files, such as those you might open from an email or file transfer. Here's how you can recover one of these unsaved files.
To recover an unsaved version of a file:
- Open Excel 2010 and click on the File tab.
- Click Recent on the left, and then click the Recover Unsaved Workbooks button.
- In the Open dialog box, you'll see the contents of your UnsavedFiles folder. For Windows Vista/7, this location is: C:\Users\User_Name\AppData\Local \Microsoft\Office\UnsavedFiles. For Windows XP, the location is: C:\Documents and Settings\User_Name \LocalSettings\Application Data\Microsoft\Office\UnsavedFiles.
Note that the files saved in your UnsavedFiles folder will no longer be available after four days from the file's creation or modification.
Set up variable headers and footers for multi-page templates
When you're creating a template, you'll often want the header and footer on the document's first page to be different than the header and footer used on subsequent pages. A letterhead template is a classic example--typically, the first page of the letter should include your company letterhead, whereas subsequent pages should not. However, not all of your letters will be two or more pages in length. How then can you set up the headers and footers for subsequent pages without adding an unwanted extra page to your template? The trick is to create a ghost page in your template, apply the desired header and footer to the ghost page, and then remove the ghost page before you save the template.
To begin, create a new template, choose File | Page Setup from the menu bar (Format | Document in Word 2001), and then click on the Layout tab. Select the Different First Page check box, and then click OK to return to your template. Next, add the ghost page by pressing [Ctrl][Enter] ([shift][enter] in Word 2001) to insert a manual page break. Press [Ctrl][Home] to return to the top of the template ([command][home] in Word 2001), and then choose View | Header And Footer from the menu bar. At this point, the First Page Header area should be visible. Add the desired information to the first-page header and footer areas, using the Switch Between Header And Footer button on the Header And Footer toolbar as needed. When you're ready to create the header and footer for subsequent pages, click the Show Next button to advance to the header and footer for your ghost page. Add the desired information, and click the Header And Footer toolbar's Close button when you've finished. Now that all your template's headers and footers are in place, remove the ghost page by deleting the page break you inserted earlier. Finally, save the template. When you create a one-page document based on your template, the first-page header and footer will automatically be applied. As soon as the document exceeds one page, the header and footer you applied to the template's ghost page will be applied to all subsequent pages.
To begin, create a new template, choose File | Page Setup from the menu bar (Format | Document in Word 2001), and then click on the Layout tab. Select the Different First Page check box, and then click OK to return to your template. Next, add the ghost page by pressing [Ctrl][Enter] ([shift][enter] in Word 2001) to insert a manual page break. Press [Ctrl][Home] to return to the top of the template ([command][home] in Word 2001), and then choose View | Header And Footer from the menu bar. At this point, the First Page Header area should be visible. Add the desired information to the first-page header and footer areas, using the Switch Between Header And Footer button on the Header And Footer toolbar as needed. When you're ready to create the header and footer for subsequent pages, click the Show Next button to advance to the header and footer for your ghost page. Add the desired information, and click the Header And Footer toolbar's Close button when you've finished. Now that all your template's headers and footers are in place, remove the ghost page by deleting the page break you inserted earlier. Finally, save the template. When you create a one-page document based on your template, the first-page header and footer will automatically be applied. As soon as the document exceeds one page, the header and footer you applied to the template's ghost page will be applied to all subsequent pages.
Use effective digital images on any budget
Inserting digital photos is an effective technique to add personality to your presentations, but you might not have the budget for a high-end digital camera. If you want digital images without spending hundreds of dollars, consider these alternatives:
- Photo disks. Many film developers now offer for purchase a CD with the digital images of each photo on your roll.
- Disposable digital cameras. These disposables are more expensive than 35mm disposables and still require processing, but allow you to preview, delete, and re-shoot photos.
- Scanners. You can scan your film photos to create digital images.
- Low-price digital camera. You can now purchase a digital camera for as low as $50. You lose some features and potential quality with lower-end cameras, but even a low-resolution image may serve your needs.
Navigating the motion editor
In Flash Professional CS5, there are some new keyboard modifiers to help you move around the Motion Editor.
To pan/scroll horizontally, use Shift-scroll wheel.
To zoom in and out, use Option-scroll wheel (PC: Alt-scroll wheel).
To select multiple keyframes at once, click-and-drag (marquee select) the keyframes.
To turn off Auto-Zoom in the graphs, use the option in the Motion Editor panel's flyout menu.
To pan/scroll horizontally, use Shift-scroll wheel.
To zoom in and out, use Option-scroll wheel (PC: Alt-scroll wheel).
To select multiple keyframes at once, click-and-drag (marquee select) the keyframes.
To turn off Auto-Zoom in the graphs, use the option in the Motion Editor panel's flyout menu.
Customizable Project panel data columns
The Project panel can display any XMP metadata fields you choose, not only the clip data fields. Choose Metadata Display from the flyout menu to select which metadata columns to display, add properties to a schema, and change the order of columns. Adobe Premiere Pro saves your choice of columns in the workspace, so you can have a different set of data displayed for your Ingest/Logging workspace vs. the one you use for Editing.
64-Bit-what does that mean
Photoshop CS5 is now capable of running in native 64-bit on both Mac and Windows. This means Photoshop can now address hundreds of gigs of RAM (instead of just 4 GB). The results are speedier operations-the bigger the file, the bigger the difference. The 32-bit version is on the same disc, so if your third-party plug-ins haven't been updated yet, you can run Photoshop in 32-bit.
Add a color to the layer in CS6
Colorizing folders and files is a great way to keep them visually organized. Photoshop CS6 offers you the option to apply a color to your layers so you can do the same with your layers. To do this, [right]-click ([ctrl]-click on the Mac) a layer and select a color from the pop-up menu
Dupe a group in CS6
In previous Photoshop versions, you could duplicate a layer with a single key command. But you could only dupe one layer at a time, and not a layers group. Now in Photoshop CS6, you can apply the same keyboard shortcut to a layer group or to multiple layers at once. To dupe a layer group, simply select the layer group, press [Ctrl]J ([command]J on the Mac) and Photoshop will duplicate your layer group, as shown in Figure A. To dupe multiple layers at the same time, [Shift]-click multiple contiguous layers or [Control]-click ([command]-click on the Mac) multiple non-contiguous layers, and then press the same keyboard command.
Create a button without writing code
If you want to create a button to move to the next frame in a presentation, draw a button, select it, open the Code Snippets panel (Window>Code Snippets), twirl down the Timeline Navigation folder, and then double-click Click to Go to Next Frame and Stop. You'll see the code in the Actions panel with an explanation of what it's doing. You now have a fully functional "next" button, without writing a line of code.
And even more basic
One of the biggest timesavers to ever learn with Illustrator is using the X key to switch between the current Stroke and Fill. Use this, along with the Forward Slash (/) key for no Fill or Stroke, and your life will be so much easier.
Adobe InDesign CS5 - Tool Hints
The new Tool Hints panel (Window>Utilities>Tool Hints) lists all the hidden modifier key behaviors available for the currently selected tool. For example, look at the Tool Hints panel when the Selection tool is active to discover that to select an item in a group, you no longer have to switch to the Direct Selection tool first. You can just double-click on the item with the Selection tool. To jump back up to having the group selected, simply press the Esc key.
Considerations in network naming schemes
When choosing descriptors for interfaces or devices, you may wonder about the best approach, since changes can become more complicated after everyone is used to the old names. Here are two opposite naming approaches:
- Use names that identify where interfaces fall in your network topology, so it's easy to figure out what's going on when you're troubleshooting or training a new network administrator. For example, the third router in VLAN 2 might have a name with "v2r3" in it. Also, in a WLAN, consider using information that helps positively identify the device, such as a zip code. A logical naming scheme has the advantage of scalability. However, if too much information is crammed into the names, they can become unwieldy and hard to remember.
- The opposite approach is security by obscurity; for example, some people want to avoid using names that make it too easy to guess the structure. "Cute" names are chosen rather than ones relevant to the network topology. This method may be useful for naming a small number of widely used servers. For example, "Saturn" is easier to remember than "w0otr35." If you have names that aren't very descriptive, it's helpful to use a database to link the names with additional relevant information. You can also use LDAP metadata for this purpose. There are two main problems with non-descriptive names, though. "Cute" names doesn't scale well if your network expands to thousands of devices. Also, databases of names are only useful if they're kept up-to-date.
Useful commands to list interface descriptions
If you have many devices in your network, it can be useful to get a list of interfaces and their descriptions. To do so, simply use the following command:
show interface description
Depending on the device, this may also show you status information. Alternatively, you can use "show interface status" to get status information and also see the interface names.
These commands are also very useful with the "include" clause covered in an earlier tip. For example, type the following to show the interface description matching "client*":
sh int desc | incl client*
Multilayer Opacity and Fill-and so much more
The ability to select multiple layers and adjust the Opacity or Fill was at the top of many Photoshop users lists. From text to image data, those living in layers will enjoy massive amounts of time saved. Speaking of layers, you can now choose your own default layer styles (just click the Make Default button in the Layer Style dialog).
Justify text with last line aligned right
If you ever encounter a scenario where you want to justify your InDesign text with the last line aligned to the right, you'll notice it is not among the alignment options in the Control Bar.
That is why designers usually think this kind of alignment isn't possible in InDesign. Most designers are so used to finding what they need in the Control Bar that they forget it is only a shortcut to options that are spread out in other panels. If you open those panels, you will find more options.
So to set justified text with the last line aligned right, open the Paragraph panel (choose Window > Type & Tables > Paragraph) and there you'll find the "justify with last line aligned right"-button.
Collaborate with clients and teammates
With the collaboration tools in Fireworks, you can make the feedback process as painless as possible, and look professional and graceful as you do it. There are several different ways to share your work and you can choose the right approach for each situation-Share My Screen, Export Adobe PDF, Preview in Browser, Create AIR File, Demo Current Document, and Export HTML and CSS.
Apply changes to multiple layers at once in CS6
Prior to CS6, if you wanted to apply the same layer blending mode, opacity, or fill to multiple layers, you had to apply the change to each layer individually. Now, all you have to do is [Shift]-click to select multiple contiguous layers or [Ctrl]-click ([command]-click on the Mac) multiple non-contiguous layers and then apply the change. Photoshop applies the change to all of your selected layers simultaneously
Auto select layers in CS6
When you work in Photoshop, you usually acquire a lot of layers—and if you're in a rush you don't always name them properly. So when you need to select a layer, you first have to find the layer. In previous versions you could right-click on the canvas and choose from a list of layers revealed in a pop-up menu. Now it's even easier. Simply select the Move tool, make sure to select the Auto-Select button on the tool options bar, and then just click on the canvas where you want to select. We clicked on the text in our image and Photoshop selected the correct layer.
Commands to debug NTP synchronization
NTP (Network Time Protocol) synchronizes the time for time servers and clients. You can use it to synchronize your routers, switches, and access points. Synchronization also makes logs more useful, by ensuring that the timestamps are reliable.
Unfortunately, a number of things can go wrong with NTP synchronization. If NTP isn't working properly, there are several debug commands you can use to help troubleshoot the problem.
To initiate any debug commands, first make sure service timestamps are on:
service timestamps debug datetime localtime msec
You can then use debug commands such as the following:
debug ntp events
debug ntp errors
For further information, there are additional debug commands available, including:
debug ntp packet
debug ntp validity
debug ntp authentication
The first one (packet) shows you the NTP packets. The second (validity) displays failed tests. The third shows the authentication key ID.
Another thing you can try if NTP isn't working is to set client times close to the proper time. If the time is too far off, NTP may not kick in.
For more information on common NTP problems and troubleshooting steps, see the following link:
https://supportforums.cisco.com/docs/DOC-1263
A quick way to show IP addresses for your interfaces
Sometimes, you may want to see the interfaces and IP addresses assigned to them, without too much additional information. This is helpful, for example, if you need a listing of IP addresses for the VLANs connected to a given switch.
To do this, simply use this command:
show ip interface brief
You can also abbreviate it like so:
sh ip int br
Ground shadows for 3D
Easily turn on ground shadows for 3D objects using 3D>Ground Plane Shadow Catcher. In the 3D (Scene) panel, set the Quality drop-down menu to Ray Trace (Draft or Final) to start the render and actually see the shadow. In the 3D (Lights) panel, turn shadows on or off for individual lights using the Create Shadows checkbox, and then adjust the Softness. In the 3D (Mesh) panel, you can adjust the shadow Opacity. Choose Snap Object to Ground Plane from the 3D panel's flyout menu if necessary to see the shadow.
Artboards. So many artboards
When creating your project design in Adobe Illustrator CS5, you can use the multiple artboards feature to break up your design. When importing (File>Import>Adobe Illustrator File) your project into Flash Catalyst, individual artboards convert into unique pages in Flash Catalyst!
Adobe Dreamweaver CS5 Live View navigation tricks
Did you know that you could also use Live View for digging into remote sites? Just type any URL in the Live View location bar at the top of the document window, and surf right to that site-using all of the CSS tools to show you what's happening underneath the hood, the Related Files bar to give you immediate access to the code underneath, and Live Code showing you the markup as you interact with it.
Collect, organize, and purge projects and footage in Adobe After Effects CS5
Use File>Collect Files to move a project and its assets to a single folder before sharing it, moving it to another computer, or archiving it. The Consolidate All Footage, Remove Unused Footage, and Reduce Project commands in the File menu are also great for cleaning up a project.
Sequence marker comments displayed in tooltip
After setting a new sequence marker, you can enter a name and a comment in the Marker dialog. Once the marker is set, hovering over it in the Timeline produces a tooltip that displays the marker information. This allows you to quickly scan a number of markers to determine their contents, without having to double-click on each of them to open the Marker dialog in order to read the content.
Share color swatches
Fireworks can now share Adobe Swatch Exchange (ASE) files with Illustrator, Photoshop, InDesign, and Kuler. Use the Swatches panel in each application to save or open swatch libraries.
Give your slicers a face lift
Excel 2010's new PivotTable filters, slicers, can give your worksheet a dashboard-like feel. While your slicers have their own tab on the Ribbon that lets you control a great deal about how they look and operate, you might have noticed something missing. There's no group for adjusting a slicer's font settings.
Fortunately, you can change a slicer's font attributes, but you have to use a bit of a workaround.
You need to create a new style for your slicer. Here's how.
To change a slicer's font:
You need to create a new style for your slicer. Here's how.
To change a slicer's font:
- Select your slicer and go to its Slicer Tools Options tab.
- Right-click on the currently selected slicer style in the Slicer Styles group and choose Duplicate from the shortcut menu. (You cannot modify Excel's built-in styles so duplicating it is creating a custom style that you can change.)
- In the Modify Slicer Quick Style dialog box, enter a name for the custom style in the Name text box. We called our style Custom Slicer Style.
- Select Whole Slicer in the list box and click the Format button. The Format
Slicer Element dialog box displays. - Click on the Font tab, if needed, and then adjust your font attributes.
- Click OK twice to dismiss both dialog boxes. Your slicer should display its new font settings.
- If you want to apply the new font to other slicers, simply apply your custom style to them by selecting it from the Slicer Styles group.
Note that if you want to use the custom style as the default slicer style, select the Set As Default Slicer Quick Style For This Document check box in the Modify Quick Slicer Style dialog box. All future slicers will automatically have your custom style applied.
Change the ruler's measurement units for comfortable form and report design
The ruler is a great way to ensure that your reports print accurately or your form controls are right where you want them. However, you may not know exactly what measurement units Access' ruler indicates. If you're more comfortable with the metric system (centimeters instead of inches), you can adjust your ruler permanently. Or, if you have Access 2003, you can simply input measurements in your preferred unit.
To change the ruler's units of measurement:
- Access your Windows Control Panel, which you can usually find on the Start menu.
- Double-click on the Regional And Language Options icon. If you're using Windows XP's Category view, just click on Date, Time, Language, And Regional Options and then click on Regional And Language Options.
- In the Regional And Language Options dialog box, select the Regional Options tab, if necessary.
- Click the Customize button to display the Customize Regional Options dialog box.
- Select the Numbers tab, if necessary.
- Choose either U.S. or Metric from the Measurement System dropdown list and click OK to apply it.
Of course, since the ruler is based on the Windows regional settings, this means that the change from one measurement system to another affects your entire operating system.
In Access 2003, if you want to enter measurements in a different unit, but you don't want to make the change permanent, you can do so. For instance, follow these quick steps to set a report's left margin to six centimeters:
In Access 2003, if you want to enter measurements in a different unit, but you don't want to make the change permanent, you can do so. For instance, follow these quick steps to set a report's left margin to six centimeters:
- Choose File | Page Setup from the menu bar.
- Click on the Margins tab, if necessary.
- In the Margins (Inches) panel, type 6cm in the Left text box and press [Enter].
When you press the [Enter] key, Access automatically converts the six centimeters into its equivalent inches, since our operating system is set to the U.S. measurement system. If you're using the metric system as your default, you can perform the same automatic conversion by typing the text in after your measurement. Access converts the measurement from centimeters to inches.
Adapt for Access 2010: To adjust a report's margins, use the Page Setup contextual tab, which is part of the Report Design Tools. In the Page Layout Area, click on Page Setup.
Adapt for Access 2010: To adjust a report's margins, use the Page Setup contextual tab, which is part of the Report Design Tools. In the Page Layout Area, click on Page Setup.
Annotating Objects in InDesign
You can insert notes in text and manage them with the Notes panel. But what if you want to add notes to objects, as well?
Use the Script Label panel (Window > Utilities > Script Label). Select any object on a page, and then enter your note for that object in the Script Label panel.
Whenever the object is selected the note text will appear in the panel. Of course, the Script Label panel was never intended for this purpose, but that shouldn't get in your way if it works for you!
Finer control of keyframe edits
This feature improves the control and precision when dragging keyframes in a confined space. For example, audio gain values can jump dramatically in coarse amounts when dragging an audio volume rubber band or keyframe in the confirmed vertical space of an audio track. To more precisely set the gain value, drag while holding down modifier keys to yield finer control of the rate of change in the parameter value. Hold down Option (PC: Alt) to change the numeric value by 1; hold down Command (PC: Ctrl) to change the numeric value by 0.1.
Filter layers in CS6
CS6 has a new way to help you sort through your layers: filtering option. Located at the top of the Layers panel is a pop-up menu with 6 options to choose from to filter your layers.
When you select one of the options, Photoshop only displays the layers that fall into that category and hides the others. Each item in the pop-up menu also presents you with different options to choose from to narrow down your search results. These options include:
When you select one of the options, Photoshop only displays the layers that fall into that category and hides the others. Each item in the pop-up menu also presents you with different options to choose from to narrow down your search results. These options include:
- Kind. When you select the Kind option, Photoshop displays 5 buttons allowing you to filter your layers by: pixel layers, adjustment layers, type layers, shape layers, or smart objects.
- Name. When you select the Name option, Photoshop displays a text box for you to type in the layer name so you can easily search for a layer by name.
- Effect. When you select the Effect option, Photoshop displays a pop-up menu with a list of layer effects to filter by, such as Drop Shadow, Bevel & Emboss, etc.
- Mode. When you select the Mode option, Photoshop displays a pop-up menu with a list of layer modes to filter by, such as such as Multiply, Screen, etc.
- Attribute. When you select the Attribute option, Photoshop displays a pop-up menu with a list of layer attributes to filter by, such as such as Visible, Locked, etc.
- Color. When you select the Color option, Photoshop displays a pop-up menu with a list of colors to filter by, such as such as Red, Blue, etc.
Lighten a color without changing its hue or saturation
The Adobe Color Picker allows you to select foreground, background, and text color in Photoshop. To open it, simply click on the Foreground or Background box in the Tools panel. By default, the H (Hue) option button is selected, so you can select a color using the Color slider and Color field or by entering numeric values. Don't stop there, though.
Once you select a color, you can adjust its saturation without changing the hue or brightness. Simply select the S option button and adjust the color values in the same way you picked a hue.
You can also lighten a color without changing its hue or saturation. Simply select the B option button and adjust the brightness values. Click OK to apply the color.
No more missing fonts!
When you include the fonts as part of the Package command (File>Package), InDesign now generates a Document Fonts folder. When you open an InDesign file that's located in a folder that also includes a Document Fonts folder, InDesign will automatically install the fonts the document needs! And when you close the document, the document fonts are automatically uninstalled for you. So is there ever a reason not to enable the Copy Fonts checkbox in the Create Package Folder dialog?
Learn the Numbers
While working with the Perspective Drawing tools, you can use 1-4 on your keyboard to change the active plane (the number four key deactivates all the grids). To see which plane is active, look at which side is highlighted in the Plane Switching widget. The number five key also has a function: Use it with the Perspective Selection tool (Shift-V) to drag objects perpendicular to the grid plane.
Good and bad news for securing smaller enterprise networks
Sometimes smaller enterprises may feel a sense of security from the belief that hackers are more likely to attack high value targets, such as large businesses and government agencies. However, a study by Verizon, in cooperation with the U.S. Secret Service and the Dutch High Tech Crime Unit, suggests that hackers have been increasingly targeting smaller businesses, presumably since the likelihood of getting caught and facing big penalties is lower.
While the study underscores the need for vigilance in enterprises of all sizes, it also reveals some good news for smaller organizations: The vast majority of attacks used techniques that could be thwarted by relatively low-cost, standard security measures.
According to the Verizon RISK Team's 2011 Data Breach Investigations Report, 63% of security breaches could be prevented by "simple and cheap" measures, while only 4% would have required the most advanced, expensive efforts to be prevented.
Filter IOS command output with include and exclude
"Show" and "more" commands can spit out a ton of data to digest. To pinpoint the important information, use the "include" and "exclude" clauses. The syntax is fairly simple; just end the command with " | include" or " | exclude" at the end of the command, followed by a regular expression. Note the mandatory pipe (vertical bar) character (|).
"Include" causes the command to display only those results that match the regular expression, while "exclude" displays only those results that don't match the regular expression.
For example, the following command outputs the configuration, minus potentially sensitive lines that include "enable" or "username":
show running-config | exclude enable|username
SWF size history
You can now keep track of the size of your SWF in the Properties panel using SWF History. Every time you publish a SWF you'll see a running log of your publish size, date, and time. Three data points are displayed in the Properties panel but if you click the Log button you can see up to 100. You'll also see an alert icon if your SWF increased in size by more than 50%.
Add grain to bring consistency to composites
One of many changes to Camera Raw 6 is the ability to add grain. Grain can be used to add warmth to an image, hide blemishes and mimic film stock-but can also be used to establish consistency between images of varied ISO (or "film speed"). Consider the case of a shot taken midday and another at sunset; compositing the midday image onto the sunset will look artificial due to mixed texture, but a sprinkle of additive grain will bring consistency and believability to your composite. Best off all, the results are editable and non-destructive (when used as smart objects).
Adding Ornaments Between Paragraphs
You can use any object (or group of objects) as an ornamental separator between paragraphs.
1. Anchor the graphic as the first character in the second paragraph.
2. Select the anchored frame or group and choose Object > Anchored Object > Options (or Option/Alt click on the anchor icon attached to the frame).
3. Choose the Above Line option.
4. Use the other settings in the Anchored Object Options dialog box to control where the object will appear in the space between the current line and the line before it.
Zoom with the mouse scroll wheel
To zoom in to or out from the center of the view, place the pointer over the panel and move the scroll wheel accordingly. To zoom in on or out from a specific point, place the pointer over the panel and hold Option (PC: Alt) as you move the scroll wheel.
Subscribe to:
Posts (Atom)