Alphabetizing Menus in InDesign

Ever have trouble finding a particular item in one of InDesign's menus? Maybe you know the item is there somewhere, but can't quickly locate it. Or maybe you just think it was there, but you're not really sure. In either case, you can track down the item faster by displaying menu items in alphabetical order.

To do that, just hold Command+Shift+Option/Ctrl+Shift+Alt before clicking on the menu title. Alphabetizing a menu also removes the divider lines that group related items together.


View Menu normal order


View Menu alphabetized

Or you can just view a submenu in alphabetical order by pressing Command+Shift+Option/Ctrl+Shift+Alt before clicking on the submenu.


Corner Stroke Effects

Ever wish you could make a stroke only applied to the corners of an object? Here's how.

Use the Stroke panel to create a new dashed stroke style. For now, just give it a name and click OK.


Next, apply your new stroke style to an object in your layout with the desired stroke width.

Reopen the Stroke Styles dialog box and double-click on your new stroke style to edit it.

In the dialog box, set the Pattern Length to a large value (larger than any frame you expect to apply the stroke style to). For the Corners option, choose Adjust Gaps.


Make sure Preview is selected, and then just the Length value until you see the desired effect.


By playing with the values, you can make strokes that appear only in the corners of objects, or even strokes that appear to bracket frames.


Reordering Paragraphs With GREP in InDesign

Ever have a sequence of paragraphs that you needed to put in a different order? If it's just one or two paragraphs, you could copy and paste. But what if you need to make the same change dozens, or even hundreds of times? In that case, it's time to use a little GREP Find/Change. The key is to use the Found Text expression.

Here's a sequence of paragraphs of contact information.


Say you needed to rearrange the last two paragraphs so the email address comes before the Twitter handle. No problem.

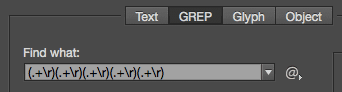
Open the Find/Change dialog box and click on the GREP tab. In Find What, search for a sequence of five paragraphs using the expression, one or more of any character, followed by an end of paragraph .+\r

Enter this five times and put each one in parentheses to group them into separate sub-expressions.


Now rearrange the sub-expressions by replacing them with the code for Found Text 1-5, indicated by dollar sign plus the number. And simply put the fifth found item $5before the fourth $4.


Run the find/change and voila, the information is reordered.


The one "gotcha" you have to be careful of is that GREP find/change will mess up any text formatting you have applied to individual words or paragraphs. So you should do this before you apply formatting!

Give your black and white art the outline it's missing

Give your black and white art the outline it's missing

While line art works best in the stained glass technique, don't let a good design slip by because it doesn't have an adequate outline. If you have a design with a lot of solid areas of black, it's easy to transform that into more refined line art for this technique. We'll show you how using Photoshop's custom shape, Ornament 2.

To create the custom shape:
  • Press D to set the default foreground color to black.
  • Choose the Custom Shape tool from the Tools panel.
  • Click the Fill Pixels button on the Custom Shape tool options bar.
  • Choose Ornament 2 from the Shape preset picker, located in the Ornaments set of the Custom Shape Presets.
  • Press and hold down [shift], and draw the custom shape on your canvas.

To refine the lines:
  • Select the Magic Wand tool from the Tools panel.
  • Deselect the Contiguous check box and set the Tolerance to a low number; we used 1.
  • Click on an area that's black to select all the black pixels in the shape.
  • Choose Select > Modify > Contract.
  • Enter 10 in the Contract By text box and click OK. Depending on the resolution and complexity of your image, you may need to enter a different amount.
  • Press [delete] ([Backspace] in Windows) to delete the extraneous black pixels.

Don't flip flop between RGB and CMYK (CS3/CS4/CS5/CS6)

Multiple conversions between RGB and CMYK color space can degrade your image file since Photoshop rounds off the color values each time it makes a conversion. The best workflow is to make all of your image adjustments in RGB mode, then convert images to CMYK if you need the files separated that way for printing purposes.

Quickly select a table & display table headings at the top of every page in MS Word

Display table headings at the top of every page in MS Word

When you create a lengthy table, Word doesn't display the table's headings (i.e., the table's first row) at the top of each page that contains a portion of the table. This can make multi-page tables hard to read. However, you can easily configure Word to repeat a table's heading row wherever the table breaks across pages.

If you'd like to use just the first row of your table as a repeated heading, place the insertion point anywhere within the table's first row. Or, if you'd like to use more than one of the table's top rows as your table headings, select them first. Next, choose Table | Heading Rows Repeat from the menu bar.


Zoom to a specific magnification without the Zoom tool in QuarkXPress

You don’t need to select the Zoom tool to zoom in or out on your layout page. Instead, press [ctrl]V ([Ctrl][Alt]V) in Windows) and type the zoom magnification you want Quark to display. For example, if you want to zoom out to 50 percent magnification, type 50 and press [return] ([Enter] in Windows). If you want to zoom in to 200 percent magnification, type 200 and press return ([Enter] in Windows).

Easy way to import an image into QuarkXPress

To import an image into a QuarkXPress document, you don’t need to first create a picture box. You can easily just choose File > Import, or press [command]E ([Ctrl]E in Windows) to open the Import dialog box. But if you do decide to draw the picture box first, you still have options. Not only can you use the same import commands, but you can also double-click on the picture box to open the Import dialog box. Before you do, however, make sure the Picture Content tool is selected in the Toolbox!