How to Create a Simple Geometrical Pattern in Adobe Illustrator

What You'll Be Creating

In this Quick Tip tutorial, I'm going to show you how to create a simple and trendy geometrical pattern, the quick and easy way. First, we will create a special repeating shape, and then we will move this object using the Smart Guides tool. In the end, we will have a pretty and modern pattern that we'll recolor.

Convert Illustrator artwork to grayscale

I'm often asked how to turn full color Illustrator artwork into a grayscale equivalent. This is simple if you know where to look:

1. Open your color .ai or .eps file in Adobe Illustrator CS3/CS4
2. Select the artwork that you want to convert to grayscale
3. Choose Edit > Edit Colors > Convert to Grayscale
That's all there is to it. If the colors in your original artwork don't map to pleasing grays, you can try one or more of the following to adjust the tonal values of the grays:
* Convert your file from CMYK to RGB or vice versa by choosing File > Document Color Mode before you convert it to grayscale. Even though the colors may not look much different in RGB or CMYK on the screen, they will convert to different grayscale tones.
* Choose Edit > Edit Colors > Adjust Color Balance before or after you convert the artwork to grayscale
* Choose Edit > Edit Colors > Saturate after you convert the artwork to grayscale.

Illustrator Tip: Duplicate a shape along a circle

This is one of those little workflows that can be a complete pain on the rare occasion that you need it. So I’m making this as much as a reminder for myself and our design team as it is a tutorial.


30 Photoshop secrets to improve your skills

Power up your skills as we reveal 30 Photoshop secrets that will increase your productivity overnight.


If you've decided to give your best pencils a little rest and jump into digital art, you'll more than likely need some photo editing software. Photoshop is an amazing piece of software and a popular choice, being used by thousands of designers worldwide on a daily basis. It's such a flexible bit of kit that you could spend a week learning new features, doing Photoshop tutorials and experimenting with Photoshop brushes and still have only scratched the surface of what's possible.

Once you've overcome the beginners' learning curve, however, there are some real gems hidden inside Photoshop that can help you speed up your work and get more out for less effort. Here we've rounded up 30 of the best Photoshop secrets to help sharpen your skills and improve your productivity.


Photo Manipulate an Eye Catching Poster Design for Earth Hour

Photo Manipulate an Eye Catching Poster Design for Earth Hour

In this tutorial, we will learn how to create an conceptual earth hour photo-manipulation. We are going to learn the process of creating depth of field using a few advanced tools. We are going to learn how to blend images so seamlessly that it would look like a single image using the Brush tool, masking tools and several adjustment layers. We will learn how to create light and darkness to make the background look seamless. We are going to learn how to use textures and give life to our image, and we are going to learn how to create a moody, dreamy tone using a few adjustment layers and lighting effects.

Apply shading to alternate rows in a worksheet

This article shows you how to automatically apply shading to every other row in a worksheet. You can apply the shading by using a simple conditional formatting formula. Alternatively, you can apply a predefined Excel table style to your data.

Technique 1: Apply shading to alternate rows by using conditional formatting

One way to apply shading to alternate rows in your worksheet is by creating a conditional formatting rule. This rule uses a formula to determine whether a row is even or odd numbered, and then applies the shading accordingly. The formula is shown here:

=MOD(ROW(),2)=0

On the worksheet, do one of the following:

To apply the shading to a specific range of cells, select the cells you want to format.

To apply the shading to the entire worksheet, click the Select All button.


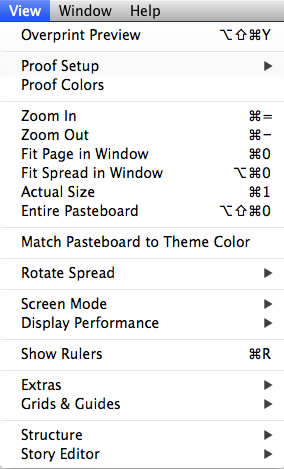
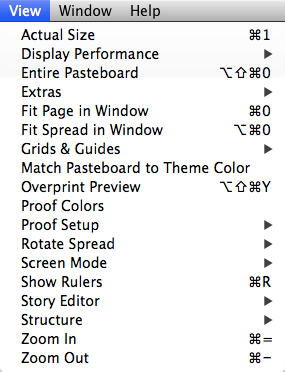
Alphabetizing Menus in InDesign

Ever have trouble finding a particular item in one of InDesign's menus? Maybe you know the item is there somewhere, but can't quickly locate it. Or maybe you just think it was there, but you're not really sure. In either case, you can track down the item faster by displaying menu items in alphabetical order.

To do that, just hold Command+Shift+Option/Ctrl+Shift+Alt before clicking on the menu title. Alphabetizing a menu also removes the divider lines that group related items together.


View Menu normal order


View Menu alphabetized

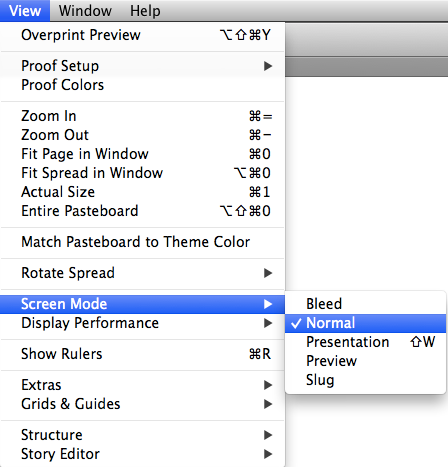
Or you can just view a submenu in alphabetical order by pressing Command+Shift+Option/Ctrl+Shift+Alt before clicking on the submenu.


Corner Stroke Effects

Ever wish you could make a stroke only applied to the corners of an object? Here's how.

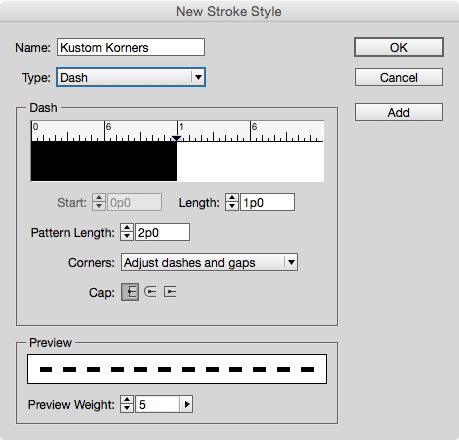
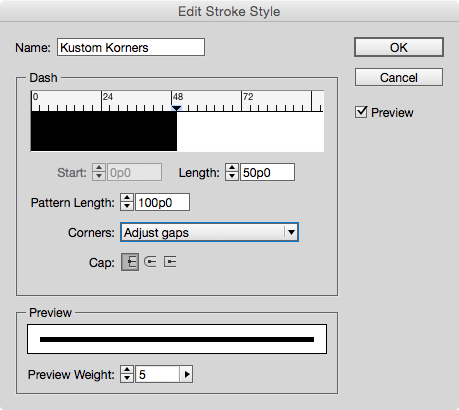
Use the Stroke panel to create a new dashed stroke style. For now, just give it a name and click OK.


Next, apply your new stroke style to an object in your layout with the desired stroke width.

Reopen the Stroke Styles dialog box and double-click on your new stroke style to edit it.

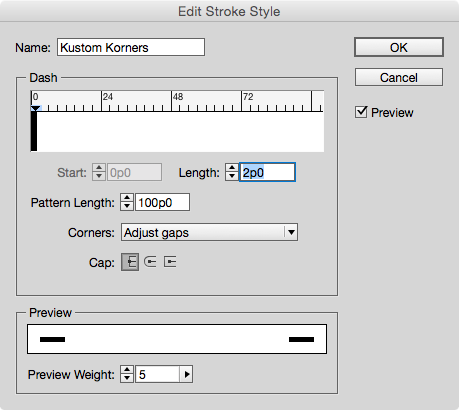
In the dialog box, set the Pattern Length to a large value (larger than any frame you expect to apply the stroke style to). For the Corners option, choose Adjust Gaps.


Make sure Preview is selected, and then just the Length value until you see the desired effect.


By playing with the values, you can make strokes that appear only in the corners of objects, or even strokes that appear to bracket frames.


Reordering Paragraphs With GREP in InDesign

Ever have a sequence of paragraphs that you needed to put in a different order? If it's just one or two paragraphs, you could copy and paste. But what if you need to make the same change dozens, or even hundreds of times? In that case, it's time to use a little GREP Find/Change. The key is to use the Found Text expression.

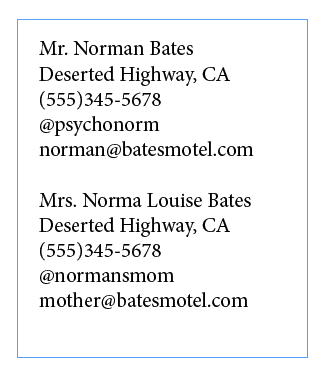
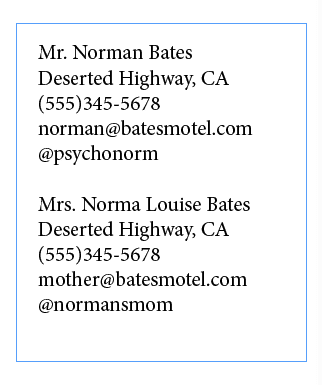
Here's a sequence of paragraphs of contact information.


Say you needed to rearrange the last two paragraphs so the email address comes before the Twitter handle. No problem.

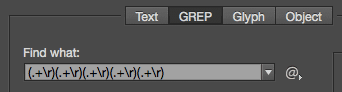
Open the Find/Change dialog box and click on the GREP tab. In Find What, search for a sequence of five paragraphs using the expression, one or more of any character, followed by an end of paragraph .+\r

Enter this five times and put each one in parentheses to group them into separate sub-expressions.


Now rearrange the sub-expressions by replacing them with the code for Found Text 1-5, indicated by dollar sign plus the number. And simply put the fifth found item $5before the fourth $4.


Run the find/change and voila, the information is reordered.


The one "gotcha" you have to be careful of is that GREP find/change will mess up any text formatting you have applied to individual words or paragraphs. So you should do this before you apply formatting!

Give your black and white art the outline it's missing

Give your black and white art the outline it's missing

While line art works best in the stained glass technique, don't let a good design slip by because it doesn't have an adequate outline. If you have a design with a lot of solid areas of black, it's easy to transform that into more refined line art for this technique. We'll show you how using Photoshop's custom shape, Ornament 2.

To create the custom shape:
  • Press D to set the default foreground color to black.
  • Choose the Custom Shape tool from the Tools panel.
  • Click the Fill Pixels button on the Custom Shape tool options bar.
  • Choose Ornament 2 from the Shape preset picker, located in the Ornaments set of the Custom Shape Presets.
  • Press and hold down [shift], and draw the custom shape on your canvas.

To refine the lines:
  • Select the Magic Wand tool from the Tools panel.
  • Deselect the Contiguous check box and set the Tolerance to a low number; we used 1.
  • Click on an area that's black to select all the black pixels in the shape.
  • Choose Select > Modify > Contract.
  • Enter 10 in the Contract By text box and click OK. Depending on the resolution and complexity of your image, you may need to enter a different amount.
  • Press [delete] ([Backspace] in Windows) to delete the extraneous black pixels.

Don't flip flop between RGB and CMYK (CS3/CS4/CS5/CS6)

Multiple conversions between RGB and CMYK color space can degrade your image file since Photoshop rounds off the color values each time it makes a conversion. The best workflow is to make all of your image adjustments in RGB mode, then convert images to CMYK if you need the files separated that way for printing purposes.

Quickly select a table & display table headings at the top of every page in MS Word

Display table headings at the top of every page in MS Word

When you create a lengthy table, Word doesn't display the table's headings (i.e., the table's first row) at the top of each page that contains a portion of the table. This can make multi-page tables hard to read. However, you can easily configure Word to repeat a table's heading row wherever the table breaks across pages.

If you'd like to use just the first row of your table as a repeated heading, place the insertion point anywhere within the table's first row. Or, if you'd like to use more than one of the table's top rows as your table headings, select them first. Next, choose Table | Heading Rows Repeat from the menu bar.


Zoom to a specific magnification without the Zoom tool in QuarkXPress

You don’t need to select the Zoom tool to zoom in or out on your layout page. Instead, press [ctrl]V ([Ctrl][Alt]V) in Windows) and type the zoom magnification you want Quark to display. For example, if you want to zoom out to 50 percent magnification, type 50 and press [return] ([Enter] in Windows). If you want to zoom in to 200 percent magnification, type 200 and press return ([Enter] in Windows).

Easy way to import an image into QuarkXPress

To import an image into a QuarkXPress document, you don’t need to first create a picture box. You can easily just choose File > Import, or press [command]E ([Ctrl]E in Windows) to open the Import dialog box. But if you do decide to draw the picture box first, you still have options. Not only can you use the same import commands, but you can also double-click on the picture box to open the Import dialog box. Before you do, however, make sure the Picture Content tool is selected in the Toolbox!

Advanced Hair Selection Using Channels in Photoshop

Masking out images with complex edges from their background in Photoshop can be daunting for some designers and Photoshop users — especially working on images with very detailed edges and textures that even Photoshop’s pen tool, at its finest, can’t handle. Good thing Photoshop never ran out of ways to make things easier for us.

In this short tutorial, I will show you an old but reliable method of masking out complex images using Photoshop’s channels. This is a great tip for all the newbies and even for intermediate users out there so heads up!

Revealing Hidden Objects With Preflight Profiles

Normally, once you hide an object in an InDesign document (via Object > Hide, pressing Command+3/Ctrl+3, or clicking the object’s Show/Hide button in the Layers panel), it leaves few traces of its presence. Hidden objects aren’t printed or exported, and they won’t show up in a Find/Change. They can, however, still affect other objects with text wrap.

But if you really want to give these objects nowhere to hide, use a preflight profile to reveal them.

From the Preflight Panel menu, choose Define Profiles. Click the + (plus) button to create a new preflight profile. Give your new profile a name, and in the IMAGES and OBJECTS options, select Hidden Page Items (plus whatever other conditions you want InDesign to check for).


Click OK, and then select your new profile from the panel menu. If there are any hidden objects, they will be listed as errors and you can double-click them in the panel to jump to their location in the document.


But you still won't see them until you show them (by pressing Command+Option+3/Ctrl+Alt+3, or choosing Object > Show All on Spread, or clicking the object’s Show/Hide button in the Layers panel).

With tools like these you can be the World Champion of Hide and Seek
(at least inside InDesign).

Using Gridify With Multi-Page Documents

Did you ever need to create a grid of pages from a multi-page document, like perhaps thumbnail images of pages from a book?

InDesign's Gridify feature seems like the perfect tool for this job, but if you try it with a multi-page document like a PDF, it seems not to work (you can only draw one frame at a time instead of a grid of them). But there are two simple tricks you can use to make the magic happen and create a grid of pages.

1. When you select your multi-page file for placing (PDF, INDD, or AI), turn on the Create Static Captions checkbox in the Place dialog box.


2. Or simply select a second file to place in addition to the multi-page document.


With either method, make sure you also select Show Import Options (or hold down the Shift key when you click Open in the Place dialog box) so you can select All pages.


Then use Gridify as normal: click and drag to define the height and width of the grid, and use your keyboard arrow keys to define the number of rows and columns.


If possible, make a grid with the exact number of pages you want to place. Then just switch to a different tool to dump either the captions or the extra file (the one that you loaded just to trick the Gridify feature into working).


If the number of pages in the document you're placing is less than the number of frames in your grid, you'll have to delete the extraneous captions/image.

Rotation: Clockwise or Counter-clockwise?

Have you ever had that moment of doubt as to which direction InDesign’s rotation angle is going to move your object? Are positive numbers clockwise or counter-clockwise?

I can’t remember myself, but there’s a little cheat that helps me look smart in front of a class. Just take a quick peek at the Rotation tool in the Tools panel. Notice that it indicates a counter-clockwise direction.


That’s your clue that positive numbers rotate objects counter-clockwise.


Negative numbers go clockwise.


This half-second glance saves me a lot of undos.

Super Fast Table Editing in Adobe InDesign

Want to change the number of rows or columns in a table really fast?

With the Type tool, move your cursor over the bottom or right edge of the table. When the cursor changes to a double arrow, click and hold, then press and hold Option/Alt and drag to the right to create more columns. Or drag down to create more rows.

This trick works in reverse too, so you can remove rows and columns by dragging up or to the left while holding Option/Alt.

Create a multi-layered file from a folder of images super fast in Photoshop

If you have a folder of images that you want to put into one Photoshop document, Photoshop comes with a preinstalled script that will make this job a snap! Simply choose File > Scripts > Load Files Into Stack to display the Load Layers dialog box. Choose Folder from the use pop-up menu, then click the Browse button and browse until you find the folder of images you want. Select the folder and then click Choose. The file names will display in the preview pane of the dialog box. (At this point, you can also select any from the list you decide you don’t want and click Remove.) When you are satisfied with the image list, click OK and Photoshop creates a new document with all of those images, each on a separate layer. One word of caution, make sure the folder isn’t full of more high resolution images than your CPU and RAM are capable of having open at one time.

Add the [shift] modifier for more color options in Illustrator

The Control panel offers you an array of choices at your fingertips. For example, the Fill and Stroke option boxes have pop-up menus, which each give you a mini Swatches panel from which you can choose colors. Want even more choices? Press and hold [shift] when you click either of these two option boxes and Illustrator will display the Color panel with mixing options based on your document’s color space.

Disabling the SSID Broadcast on Wi-Fi router

In the Wi-Fi networking, the wireless access point or router have a habit of broadcasting the network name (SSID) over the air at regular periods. This unique feature was conceptualized for all the businesses and mobile hotspots wherein the Wi-Fi clients may have to roam in and out of range. In the home network, this type of roaming feature is absolutely unnecessary, as it will increase the potential of someone trying to access your home network, thus posing a security risk. Most of the times, Wi-Fi access points will allow the SSID broadcast feature that will be disabled by the administrator.