Adobe Fireworks CS5 - Measure tool
Do you work on user interfaces? Ever make specifications that call out specific pixel measurements? Select the Measure tool from the Vector group in the Toolbox (nested under the Rectangle tool [U]), and use it to create your call outs.
Test renderings with selections
Sometimes you may want to quickly render for only a selected part of your 3D object to save time and check for specific lighting effects. That's now possible by simply making a selection on the area you want to render, and going to 3D>Progressive Render Selection.
Five Quick Tips for Multi-State Objects (MSOs)
Multi-state objects are one of the most useful tools for adding interactivity to documents you want to publish to the iPad and other mobile devices. With them you can create slideshows and other cool interactive content.
Here’s five quick tips for working with multi-state objects (MSOs) in InDesign.
When you convert regular objects into multi-state objects, it’s like you wrapped a special interactive container around the objects.
Here’s five quick tips for working with multi-state objects (MSOs) in InDesign.
When you convert regular objects into multi-state objects, it’s like you wrapped a special interactive container around the objects.
9-slice scaling in Adobe Illustrator CS5
CS3 brought a feature called 9-slice scaling from Flash Professional into Illustrator. At that time, 9-slice was only really useful for Illustrator symbols after importing them into Flash. Now, in CS5, 9-slice works on the scaling of any symbol right inside Illustrator. Let's say you want to make a button with text on it, but when you scale it up, you don't want the text to stretch or the rounded corners to distort. Make the button into a symbol (drag it into the Symbols panel) and apply 9-slice scaling (select Enable Guides for 9-Slice Scaling in the Symbol Options dialog), then you can scale the button without distortion.
Gmail Gets A Swanky New Inbox And Automatic Sorting To Help Fight Information Overload

Google today is introducing a new way to manage your Gmail inbox. This new view of your inbox puts a number of tabs at the top of Gmail’s inbox column. By default, Google shows tabs – and automatically categorizes your messages into them – for your social updates from sites like Google+, Twitter, Facebook or YouTube, promotions from the likes of Google Offers and Groupon, and a kind of catch-all “Updates” tab for your bills, receipts and similar messages.
Speed up your InDesign layouts

We simplifies object selection and frame editing with InDesign’s easy-to-use Gap tool and Live Corner Effects
How to open .pages files on a computer without iWork
Here’s a problem I’ve encountered at work a few times: You are given a .pages file, but can’t open it because you don’t have iWork’s Pages installed.
What is iWork or Pages?
Apple’s Pages application is part of the iWork software suite for Mac. It is meant to compete with Microsoft Office Word. Pages can open word “.docx or .doc” files, but Word can’t open Pages’ “.pages” files.
How to work around this problem:
Luckily, a PDF of each document is embedded within the file, and we can extract that PDF file with a little work.
What is iWork or Pages?
Apple’s Pages application is part of the iWork software suite for Mac. It is meant to compete with Microsoft Office Word. Pages can open word “.docx or .doc” files, but Word can’t open Pages’ “.pages” files.
How to work around this problem:
Luckily, a PDF of each document is embedded within the file, and we can extract that PDF file with a little work.
Moderating a presentation with multiple speakers
There are times when you have to share the spotlight with one or more fellow presenters. If it falls to you to act as moderator, here are a few points to keep in mind:
- Plan a general outline for the presentation and alert each presenter of your need to do so. This will push people to prepare their content early and do a more thorough job.
- Ask each presenter for some biographical information. If you need to warm up the audience or introduce each person before they present, a little background can be very helpful.
- Correspond with the other presenters well ahead of time and always provide ample ways to contact you. In addition, make sure you ask for multiple contact routes to stay in touch with presenters.
- Ask that each presenter consider a list of at least three questions that audience members are likely to have. Putting oneself in the place of the audience can help foster more stimulating discussion and structure a more useful presentation.
- Make each presenter well aware of the amount of time they can use for their show, and establish a signal for where time is almost up, and when they need to finish.
- Give some coaching as to the format of the question and answer part of the show: whether questions may be addressed before the next speaker, how many may be answered, and whether other speakers may chime in.
Creating your own formatting style
If you've ever wanted to create a formatting style that's different than any of the currently available styles, you'll be glad to know that there's an easy way to do it. First, select the cell that has the combination of formats that you want to include in the new style. Then, choose Style from the Format menu and in the Style name box, type a name for the new style. To define and apply the style to the selected cells, click OK. To define the style without applying it, click Add, and then click Close. Also, if no cells have the formats you want for the style, you can specify the formats when you name the style.
When, Why and How to Align All Objects to Pixel Grid in Adobe Illustrator
By default when creating new document for Web in Adobe Illustrator option Align to Pixel Grid is checked what you can see in bottom Advanced portion of New Document window.
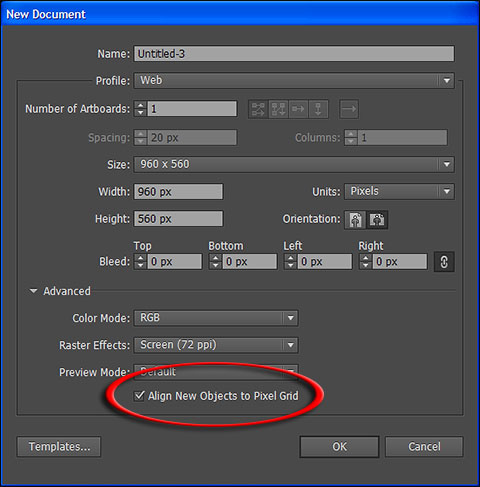
New Document window in Adobe Illustrator
New Document window in Adobe Illustrator
Advanced Keyboard Shortcuts in InDesign – Context Menu
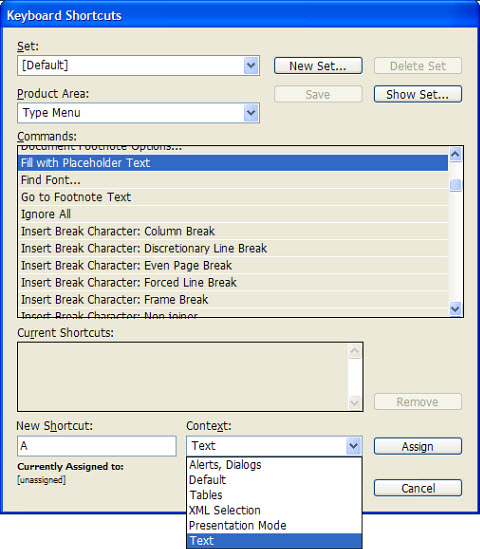
Context menu in InDesign Keyboard Shortcuts dialog
In Indesign you can assign keyboard shortcut to any command available in menus and thats nothing new and exciting because most of softwares have that option, but did you realize Context menu in Kayboard Shortcuts dialog? This pop-up menu can be incredible useful because you can assign any keyboard shortcut even and default shortcut for specific editing like text editing without conflict.
 P
P
In Indesign you can assign keyboard shortcut to any command available in menus and thats nothing new and exciting because most of softwares have that option, but did you realize Context menu in Kayboard Shortcuts dialog? This pop-up menu can be incredible useful because you can assign any keyboard shortcut even and default shortcut for specific editing like text editing without conflict.
 P
PWhat you should know before placing images in Photoshop and Illustrator
Photoshop and Illustrator resample images to match document intent. You should know how it works before placing them into those applications. Both applications will upsample or downsample images as we do in Image Size dialog when Resample Image option is turned on. So, Resolution and Pixel Dimensions will change while Document Size (physical dimension) will remain the same. Also you should pay attention whether image have Camera raw settings applied to it and I will show you in example why.


Creating cool image effects using Compound Path in InDesign
You probably know how to place image in InDesign, that’s routine and can be done in several different ways. I will skip placing image and proceed to some cool things you can do using compound path.
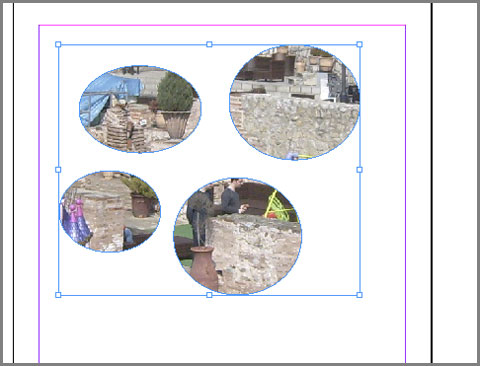
Cool image effect using Compound Path in InDesign
Cool image effect using Compound Path in InDesign
Moderating a presentation with multiple speakers
There are times when you have to share the spotlight with one or more fellow presenters. If it falls to you to act as moderator, here are a few points to keep in mind:
- Plan a general outline for the presentation and alert each presenter of your need to do so. This will push people to prepare their content early and do a more thorough job.
- Ask each presenter for some biographical information. If you need to warm up the audience or introduce each person before they present, a little background can be very helpful.
- Correspond with the other presenters well ahead of time and always provide ample ways to contact you. In addition, make sure you ask for multiple contact routes to stay in touch with presenters.
- Ask that each presenter consider a list of at least three questions that audience members are likely to have. Putting oneself in the place of the audience can help foster more stimulating discussion and structure a more useful presentation.
- Make each presenter well aware of the amount of time they can use for their show, and establish a signal for where time is almost up, and when they need to finish.
- Give some coaching as to the format of the question and answer part of the show: whether questions may be addressed before the next speaker, how many may be answered, and whether other speakers may chime in.
Creating your own formatting style
If you've ever wanted to create a formatting style that's different than any of the currently available styles, you'll be glad to know that there's an easy way to do it. First, select the cell that has the combination of formats that you want to include in the new style. Then, choose Style from the Format menu and in the Style name box, type a name for the new style. To define and apply the style to the selected cells, click OK. To define the style without applying it, click Add, and then click Close. Also, if no cells have the formats you want for the style, you can specify the formats when you name the style.
Adobe InDesign CS5 - Live distribute
Ever needed to change the amount of space between a number of aligned items on the page? To do it interactively, first select the items on the page with the Selection tool (notice that CS5 now provides a transformation bounding box around multiple selected items!) Click-and-drag one of the handles of the bounding box to resize all the items in your selection. To resize the space between each item, hold down the Spacebar while dragging.
Halting Hyphenation Without Forced Line Breaks
We've all done it: pressed shift+enter/return to stop a word from hyphenating. It's quick and easy, but it's sort of like sweeping dirt under the rug. You've solved one problem but created another. If you re-use that text either with different formatting, or in a different output a forced line break will almost always crop up in a very inopportune spot. Fortunately, there are plenty of better alternatives to stop a word from hyphenating, like these from Jean-Claude Tremblay:
1) Select the word and apply a No Break character attribute
2) Select the word and apply the No Language character attribute
3) Add a Discretionary Hyphen in front of the word (Type > Insert Special Character > Hyphens and Dashes > Discretionary Hyphen).
4) Add the word with a tilde (~) in front of it in the user dictionary
5) Use a paragraph GREP style to search the word and apply either method 1 or 2 as a character style.
1) Select the word and apply a No Break character attribute
2) Select the word and apply the No Language character attribute
3) Add a Discretionary Hyphen in front of the word (Type > Insert Special Character > Hyphens and Dashes > Discretionary Hyphen).
4) Add the word with a tilde (~) in front of it in the user dictionary
5) Use a paragraph GREP style to search the word and apply either method 1 or 2 as a character style.
Cleaning Out Old Hyperlinks in InDesign
Looking for a good InDesign New Year's resolution? How about cleaning out your Hyperlinks panel and getting rid of all the old hyperlink destinations that may be cluttering up your documents and slowing you down? Just follow these steps from a recent InQuestion column by Sandee Cohen.
1) Choose Hyperlink Destination Options from the Hyperlinks panel menu.
2) Click the Edit button in the dialog box. If you have a very long list of destinations, there might be a long pause.
3) Use the Destination menu to move through your destinations to delete the ones you don’t want, or click the Delete All button to clear the list completely.
Bonus tip: You can also use the Hyperlink Destination Options dialog box toedit your destinations. So if a client changes his URL link, you don’t have to re-create all the hyperlinks in the document—just change the destination setting.
1) Choose Hyperlink Destination Options from the Hyperlinks panel menu.
2) Click the Edit button in the dialog box. If you have a very long list of destinations, there might be a long pause.
3) Use the Destination menu to move through your destinations to delete the ones you don’t want, or click the Delete All button to clear the list completely.
Bonus tip: You can also use the Hyperlink Destination Options dialog box toedit your destinations. So if a client changes his URL link, you don’t have to re-create all the hyperlinks in the document—just change the destination setting.
Mask an image with another image
InDesign doesn't have a specific Mask command, but you can still combine two images to create unique graphics. The secret is in the Clipping Path command. You can't actually use clipping paths to mask images in InDesign, but you can use paths created in InDesign or embedded alpha channels created in an image-editing application. The Clipping Path command allows you to both create and control these types of paths.
To mask an image with an InDesign path, place the image you plan to use as a mask into your document. Next, select Clipping Path from the Object menu to display the Clipping Path dialog box. Choose Detect Edges from the Type pop-up menu. Then, click OK. Finally, click on the image with the Direct Selection tool and use the Place command to import the second image into the selected path.
To mask an image with the alpha channel of another image, select the Show Import Options check box as you place the image you plan to use as a mask and click Open. In the resulting dialog box, choose the embedded channel from the Alpha Channel pop-up menu. Click OK and click the loaded icon on the page to import the file into your document. Now, while the object is selected, choose Clipping Path from the Object menu. In the Clipping Path dialog box, select Alpha Channel from the Type pop-up menu and select the embedded alpha channel from the Alpha pop-up menu. Then, click OK. Finally, select the image with the Direct Selection tool and place the second image into the selected path.
To mask an image with an InDesign path, place the image you plan to use as a mask into your document. Next, select Clipping Path from the Object menu to display the Clipping Path dialog box. Choose Detect Edges from the Type pop-up menu. Then, click OK. Finally, click on the image with the Direct Selection tool and use the Place command to import the second image into the selected path.
To mask an image with the alpha channel of another image, select the Show Import Options check box as you place the image you plan to use as a mask and click Open. In the resulting dialog box, choose the embedded channel from the Alpha Channel pop-up menu. Click OK and click the loaded icon on the page to import the file into your document. Now, while the object is selected, choose Clipping Path from the Object menu. In the Clipping Path dialog box, select Alpha Channel from the Type pop-up menu and select the embedded alpha channel from the Alpha pop-up menu. Then, click OK. Finally, select the image with the Direct Selection tool and place the second image into the selected path.
Run your text along a path (Photoshop CS)
Did you know that Photoshop CS allows you to run text along a path? Well, it does! Just create a path using the Pen tool. Then, select the Horizontal Type tool and click the insertion point on the path where you want your text to start. Finally, just type away.
Subscribe to:
Posts (Atom)