Zoom to a specific magnification without the Zoom tool in QuarkXPress
You don’t need to select the Zoom tool to zoom in or out on your layout page. Instead, press [ctrl]V ([Ctrl][Alt]V) in Windows) and type the zoom magnification you want Quark to display. For example, if you want to zoom out to 50 percent magnification, type 50 and press [return] ([Enter] in Windows). If you want to zoom in to 200 percent magnification, type 200 and press return ([Enter] in Windows).
Advanced Hair Selection Using Channels in Photoshop
Masking out images with complex edges from their background in Photoshop can be daunting for some designers and Photoshop users — especially working on images with very detailed edges and textures that even Photoshop’s pen tool, at its finest, can’t handle. Good thing Photoshop never ran out of ways to make things easier for us.
In this short tutorial, I will show you an old but reliable method of masking out complex images using Photoshop’s channels. This is a great tip for all the newbies and even for intermediate users out there so heads up!
In this short tutorial, I will show you an old but reliable method of masking out complex images using Photoshop’s channels. This is a great tip for all the newbies and even for intermediate users out there so heads up!
Revealing Hidden Objects With Preflight Profiles
Normally, once you hide an object in an InDesign document (via Object > Hide, pressing Command+3/Ctrl+3, or clicking the object’s Show/Hide button in the Layers panel), it leaves few traces of its presence. Hidden objects aren’t printed or exported, and they won’t show up in a Find/Change. They can, however, still affect other objects with text wrap.
But if you really want to give these objects nowhere to hide, use a preflight profile to reveal them.
From the Preflight Panel menu, choose Define Profiles. Click the + (plus) button to create a new preflight profile. Give your new profile a name, and in the IMAGES and OBJECTS options, select Hidden Page Items (plus whatever other conditions you want InDesign to check for).

Click OK, and then select your new profile from the panel menu. If there are any hidden objects, they will be listed as errors and you can double-click them in the panel to jump to their location in the document.

But you still won't see them until you show them (by pressing Command+Option+3/Ctrl+Alt+3, or choosing Object > Show All on Spread, or clicking the object’s Show/Hide button in the Layers panel).
With tools like these you can be the World Champion of Hide and Seek
(at least inside InDesign).
But if you really want to give these objects nowhere to hide, use a preflight profile to reveal them.
From the Preflight Panel menu, choose Define Profiles. Click the + (plus) button to create a new preflight profile. Give your new profile a name, and in the IMAGES and OBJECTS options, select Hidden Page Items (plus whatever other conditions you want InDesign to check for).
Click OK, and then select your new profile from the panel menu. If there are any hidden objects, they will be listed as errors and you can double-click them in the panel to jump to their location in the document.
But you still won't see them until you show them (by pressing Command+Option+3/Ctrl+Alt+3, or choosing Object > Show All on Spread, or clicking the object’s Show/Hide button in the Layers panel).
With tools like these you can be the World Champion of Hide and Seek
(at least inside InDesign).
Using Gridify With Multi-Page Documents
Did you ever need to create a grid of pages from a multi-page document, like perhaps thumbnail images of pages from a book?
InDesign's Gridify feature seems like the perfect tool for this job, but if you try it with a multi-page document like a PDF, it seems not to work (you can only draw one frame at a time instead of a grid of them). But there are two simple tricks you can use to make the magic happen and create a grid of pages.
1. When you select your multi-page file for placing (PDF, INDD, or AI), turn on the Create Static Captions checkbox in the Place dialog box.

2. Or simply select a second file to place in addition to the multi-page document.

With either method, make sure you also select Show Import Options (or hold down the Shift key when you click Open in the Place dialog box) so you can select All pages.

Then use Gridify as normal: click and drag to define the height and width of the grid, and use your keyboard arrow keys to define the number of rows and columns.

If possible, make a grid with the exact number of pages you want to place. Then just switch to a different tool to dump either the captions or the extra file (the one that you loaded just to trick the Gridify feature into working).

If the number of pages in the document you're placing is less than the number of frames in your grid, you'll have to delete the extraneous captions/image.
InDesign's Gridify feature seems like the perfect tool for this job, but if you try it with a multi-page document like a PDF, it seems not to work (you can only draw one frame at a time instead of a grid of them). But there are two simple tricks you can use to make the magic happen and create a grid of pages.
1. When you select your multi-page file for placing (PDF, INDD, or AI), turn on the Create Static Captions checkbox in the Place dialog box.
2. Or simply select a second file to place in addition to the multi-page document.
With either method, make sure you also select Show Import Options (or hold down the Shift key when you click Open in the Place dialog box) so you can select All pages.
Then use Gridify as normal: click and drag to define the height and width of the grid, and use your keyboard arrow keys to define the number of rows and columns.
If possible, make a grid with the exact number of pages you want to place. Then just switch to a different tool to dump either the captions or the extra file (the one that you loaded just to trick the Gridify feature into working).
If the number of pages in the document you're placing is less than the number of frames in your grid, you'll have to delete the extraneous captions/image.
Rotation: Clockwise or Counter-clockwise?
Have you ever had that moment of doubt as to which direction InDesign’s rotation angle is going to move your object? Are positive numbers clockwise or counter-clockwise?
I can’t remember myself, but there’s a little cheat that helps me look smart in front of a class. Just take a quick peek at the Rotation tool in the Tools panel. Notice that it indicates a counter-clockwise direction.

That’s your clue that positive numbers rotate objects counter-clockwise.

Negative numbers go clockwise.

This half-second glance saves me a lot of undos.
I can’t remember myself, but there’s a little cheat that helps me look smart in front of a class. Just take a quick peek at the Rotation tool in the Tools panel. Notice that it indicates a counter-clockwise direction.
That’s your clue that positive numbers rotate objects counter-clockwise.
Negative numbers go clockwise.
This half-second glance saves me a lot of undos.
Super Fast Table Editing in Adobe InDesign
Want to change the number of rows or columns in a table really fast?
With the Type tool, move your cursor over the bottom or right edge of the table. When the cursor changes to a double arrow, click and hold, then press and hold Option/Alt and drag to the right to create more columns. Or drag down to create more rows.

This trick works in reverse too, so you can remove rows and columns by dragging up or to the left while holding Option/Alt.

With the Type tool, move your cursor over the bottom or right edge of the table. When the cursor changes to a double arrow, click and hold, then press and hold Option/Alt and drag to the right to create more columns. Or drag down to create more rows.
This trick works in reverse too, so you can remove rows and columns by dragging up or to the left while holding Option/Alt.
Create a multi-layered file from a folder of images super fast in Photoshop
If you have a folder of images that you want to put into one Photoshop document, Photoshop comes with a preinstalled script that will make this job a snap! Simply choose File > Scripts > Load Files Into Stack to display the Load Layers dialog box. Choose Folder from the use pop-up menu, then click the Browse button and browse until you find the folder of images you want. Select the folder and then click Choose. The file names will display in the preview pane of the dialog box. (At this point, you can also select any from the list you decide you don’t want and click Remove.) When you are satisfied with the image list, click OK and Photoshop creates a new document with all of those images, each on a separate layer. One word of caution, make sure the folder isn’t full of more high resolution images than your CPU and RAM are capable of having open at one time.
Add the [shift] modifier for more color options in Illustrator
The Control panel offers you an array of choices at your fingertips. For example, the Fill and Stroke option boxes have pop-up menus, which each give you a mini Swatches panel from which you can choose colors. Want even more choices? Press and hold [shift] when you click either of these two option boxes and Illustrator will display the Color panel with mixing options based on your document’s color space.
Disabling the SSID Broadcast on Wi-Fi router
In the Wi-Fi networking, the wireless access point or router have a habit of broadcasting the network name (SSID) over the air at regular periods. This unique feature was conceptualized for all the businesses and mobile hotspots wherein the Wi-Fi clients may have to roam in and out of range. In the home network, this type of roaming feature is absolutely unnecessary, as it will increase the potential of someone trying to access your home network, thus posing a security risk. Most of the times, Wi-Fi access points will allow the SSID broadcast feature that will be disabled by the administrator.
Always Change Default Settings Of Wireless Router
Always change default settings of a new wireless router. This includes – SSID name, admin username & password, wireless security method, encryption key etc. as they are not secure.
What to expect when controlling router configuration from a remote program
If you're writing software to manage or alter a network, one task you may need to do is to programmatically alter router configurations or enable and disable ports, using a remote connection. This may seem like a difficult problem. However, there's a special extension of the Tcl scripting language that you can use for this purpose, called Expect. Expect can automate telnet, ssh, and other command-line network protocols to manage remote routers and servers. Expect scripts are also useful for the initial configuration of routers, as they don't rely on SNMP already being enabled.
Make sure to enable MAC Address Filtering on your wireless router
Each and every Wi-Fi router or access point contains a special identifier known as the physical address or MAC address. Access points and routers have a tendency of keeping track of all the MAC addresses of every kind of device that is connected to them. Numerous such kind of products are offering the owner a unique option to key in the MAC addresses of their home equipment, that will restrict the network to only give permit to connections from those devices, thereby ensuring a safe and sound home network.
The fastest way to duplicate a layer in Photoshop
You can click and drag a layer to the Create A New Layer button at the base of the Layers panel to create a duplicate of that Layer. But with a keyboard combination and a slight nudge, you can do the job even more quickly. Just press and hold [command][option] ([Ctrl][Alt] in Windows) and then click on any layer thumbnail in the Layers panel and drag it slightly in any direction and release. Photoshop will create a duplicate of that layer in the Layers panel in the blink of an eye!
Scale both strokes and fills the same
One of the great benefits to Illustrator artwork is the ability to scale it to any size without increasing the file size. Of course, frustration abounds when you increase or decrease a graphic but the stroke doesn't scale in synch with the fill. (By default, the stroke stays the same when scaled.) Not to worry, there's an easy fix to keep the elements scaling in proportion with each other; you just have to set the preference. Simply choose Edit > Preferences > General. Select the Scale Strokes and Effects check box, and click OK. And if you are using the Scale Tool, make sure to set the option there as well. Simply double-click on the Scale Tool, and in the resulting Scale dialog box select Scale Strokes & Effects.
Drag to Copy Swatches
Need to copy a bunch of color swatches from one open InDesign document to another? There's no faster way than drag and drop!
Just arrange the two documents on your screen so you can see them both (a quick way to do this is to choose the 2-up option from the Arrange Documents pop-up in the Application Bar).

Then click in the document containing the swatches you want to copy. Select the swatches by Shift-clicking to select a range, or Command/Ctrl-clicking to select ones that aren’t next to each other.

Then drag and drop the swatches from the panel into the receiving document. Just don’t start dragging from one of the little colored squares or only that one swatch will be copied over. Drag from anywhere else on the selected swatches to copy them all.


Just arrange the two documents on your screen so you can see them both (a quick way to do this is to choose the 2-up option from the Arrange Documents pop-up in the Application Bar).
Then click in the document containing the swatches you want to copy. Select the swatches by Shift-clicking to select a range, or Command/Ctrl-clicking to select ones that aren’t next to each other.
Then drag and drop the swatches from the panel into the receiving document. Just don’t start dragging from one of the little colored squares or only that one swatch will be copied over. Drag from anywhere else on the selected swatches to copy them all.
Select Pages Before Moving Them
You can move or copy pages from one document to another by choosing Layout > Pages > Move Pages.
And you can make the process even easier by first selecting the pages you want to move in the Pages panel.

Then, when you open Move Pages dialog box, those pages will be already entered for you.

And you can make the process even easier by first selecting the pages you want to move in the Pages panel.
Then, when you open Move Pages dialog box, those pages will be already entered for you.
InDesign Tips: Better-Looking Drop Shadows
Even in this age of Flat Design, you occasionally need to add a drop shadow or two to make items pop. When you do, add a little noise—just 3–5% is plenty in most cases—to create a more natural-looking effect.

Creating Spot Color Swatches
To quickly create a spot color swatch, just hold down the Control (Windows) or Command (Mac OS) key on the keyboard while clicking the New Swatch button at the bottom of the Swatches panel.

If you want to edit the name or color values of the new swatch, press Alt+Control (Windows) or Option+Command (Mac OS) when you click the New Swatch button to open the Swatch Options dialog box.

If you want to edit the name or color values of the new swatch, press Alt+Control (Windows) or Option+Command (Mac OS) when you click the New Swatch button to open the Swatch Options dialog box.
Instant Violators in InDesign
Did you know that starbursts, banners, color bars, and similar attention-getting design elements are also called “violators”? This is because they violate the underlying design to attract your eye.
And in InDesign, you can convert a selected object into a starburst simply by double-clicking the Polygon tool and choosing the desired number of sides and star inset.
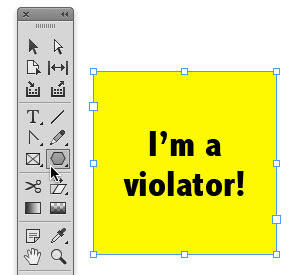
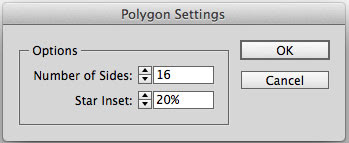

And in InDesign, you can convert a selected object into a starburst simply by double-clicking the Polygon tool and choosing the desired number of sides and star inset.
InDesign Tips- Reveal Tracking and Kerning
Ever receive a document and the text looks suspiciously squished in certain places? Suspect some rogue tracking has taken place? You can instantly reveal all tracking and kerning by going to Composition Preferences and choosing Highlight Custom Tracking/Kerning.
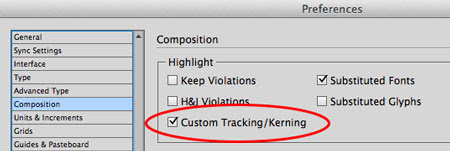
Manually applied tracking and kerning appears in dark green.

Tracking applied as part of a paragraph or character style appears in light green.

Manually applied tracking and kerning appears in dark green.
Tracking applied as part of a paragraph or character style appears in light green.
Subscribe to:
Posts (Atom)