Create a Realistic 3D Sphere Logo from Scratch Using CorelDraw
In this tutorial you’ll learn how to make a realistic 3d sphere logo. This tutorial is for designers who use CorelDraw as their main software. This kind of logo works well for technology focused companies, as it has a high-tech feel. After working through this tutorial you’ll be able to create similar designs in your work.
Adobe InDesign Tips I Wish I’d Known When Starting Out
I love Adobe InDesign. For multi-page documents, it’s the most flexible and complete application out there. Yet I remember how counter-intuitive some things were when I was learning it for the first time. Here are some tips I wish I had known when starting out, as well as some answers to questions that others often ask me. This is not intended to be a manual; some good ones are already out there (although I personally learned by doing). Hopefully, these tips will help you make the best of your day-to-day use of InDesign.
Margins And Bleeds
If you are preparing a document for print, keep your margins and bleeds in mind from the beginning. Your printer will give you the measurements for the bleed, but generally 1/8 inch or 3 mm should suffice. Approximately the same area within the document should be kept free of text and important graphic elements (such as the logo). Set up your document for bleed in InDesign as you create it by selecting the correct settings in the document set-up box.


Conditional Text and InDesign CS4
InDesign has always supported the use of layers, but layers don’t always cut it when working with text. You can put a text frame on a layer and turn that layer on and off as needed, but it’s an all or nothing approach. What if you want to show and hide individual words or paragraphs and have the text automatically rewrap when you show or hide those words? With conditional text, it’s a breeze.

1 [FIRST, WE’LL NEED A NEW DOCUMENT]
You can certainly use one of your existing documents for this, but if you’re going to follow along, you might want to go ahead and create a new document. Choose New>Document from the File menu. One page should be fine.3D Printing With Photoshop CC
Adobe has been building increasingly sophisticated 3D modeling tools into Photoshop, and this month’s release of Photoshop CC (14.2) offers the most powerful techniques yet. Now the program has been updated with the ability to generate reliable models suitable for 3D printing. And if you have a 3D printer connected to your computer, you can print those models directly from the application.
What’s New in Adobe Illustrator CC
In my opinion, there are some pretty useful updates to Illustrator CC 17.1 (January 2014). We now can finally round the corners on our paths easily and even create custom panels for tools we use all the time. There are even enhancements to age-old features and tools like the Pencil and Pen tools, and how we edit paths, among a variety of other enhancements. In this article, we’ll explore the most interesting of these new and improved features in this newest release of Illustrator CC 17.1. I’ve even included links to some videos I created for the larger feature updates, that go into a little more depth.
How to Create a Professional Magazine Layout
Have you ever wondered how professional designers strike the perfect balance between text and image? Using InDesign’s powerful type tools, you will learn techniques to help you set and arrange a magazine layout.
Step 1 Setting up the Document
We’ll be using a standard A4 size document for this tutorial. Start with setting the number of pages to 8, the bleed to 2 mm so we have some space for images to overlap, the margins to 10 mm for top and bottom, the inside margin to 13 mm and the outside margin to 20 mm. The reason for these different margins is that in a spread with 2 pages a slightly larger margin on the outside of the page looks better and provides space to hold the printed version. It is also useful for the page grid in the next step.
Creating and Applying Master Pages in InDesign
The shortcut for creating a new master page is to Command/Ctrl-click the New button at the bottom of the Pages panel.
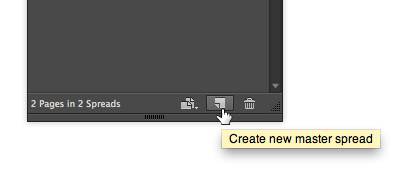
But if you want to name it, or base it on another master page, add the Option/Alt key, too!
Then, when you want to apply that master page to one or more document pages, select those pages in the Pages panel (Command/Ctrl click on each one to select more than one discontiguous page) and Option/Alt click on the master page at the top of the Pages panel.
Add Image Captions Fast in InDesign
The captions features in InDesign are cool, but if you already have dozens or even hundreds of images on multiple InDesign pages, you might be thinking “hmm, I need to select images if I want to add captions, so I guess I will be selecting all the
images, page by page.” Wrong! Instead, there is one place in InDesign that allows you to target all the images in the file at the same time and apply captions to them?
images, page by page.” Wrong! Instead, there is one place in InDesign that allows you to target all the images in the file at the same time and apply captions to them?
Defining a Symbol Registration Point in Adobe Illustrator CS5
One of the best things about Adobe Illustrator CS5 is the amount of control for placing a registration point for points. With earlier versions of Adobe Illustrator, the point registration for a point is in the centre extent dimension (make a rectangular shape for the point's extent, then place a point at the centre.)
Here's a quick example of this. We start with a simple graphic, the green flag shown below.
Here's a quick example of this. We start with a simple graphic, the green flag shown below.
Reset the Zero Point in Adobe InDesign
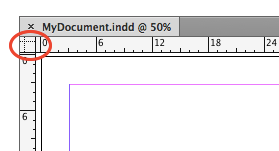
It's easy to change the zero-zero point of the document rulers: Just drag from the corner where the two rulers meet and let go of the mouse button where on your page (or pasteboard) you want the zero-zero point to sit.
But how do you get the zero-zero point back to the upper-left corner? No problem: Double-click that little square where the rulers meet to reset back to the ruler default position.
But how do you get the zero-zero point back to the upper-left corner? No problem: Double-click that little square where the rulers meet to reset back to the ruler default position.
Subscribe to:
Posts (Atom)