By looking at the features that often get overlooked and by demonstrating how you can use them in conjunction with other CS programs, it will make you a much more efficient designer.
Content-Aware Scaling

When you are required to include a photo in your InDesign layout but the photo isn’t working to the layout you had in mind, a useful trick is to take advantage of the CS4 feature of Content Aware Scaling. This feature allows you to keep the important details of the photo without ruining too much of the composition of the original photograph. Select what area you want scale, then go to Edit, then Content-Aware Scaling. Remember to use the “Protect Skin Tones” option when working on people as this usually yields the best results – click the human silhouette icon to turn it on.
Adjustment Layers
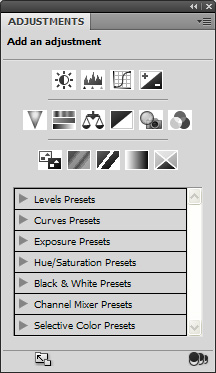
Adjustment Layers in CS4+ are much more powerful and easier to control than in earlier versions and you should take advantage of this when you are editing images for your layout. There is a hidden sub panel control that will allow you to adjust your settings (levels, curves, saturation, etc.) with much more efficiency. After clicking on one of the settings (eg. curves), use the arrow found in the bottom left corner to go back to the settings menu (like your internet browser).
Adjustment Layers in CS4+ are much more powerful and easier to control than in earlier versions and you should take advantage of this when you are editing images for your layout. There is a hidden sub panel control that will allow you to adjust your settings (levels, curves, saturation, etc.) with much more efficiency. After clicking on one of the settings (eg. curves), use the arrow found in the bottom left corner to go back to the settings menu (like your internet browser).
Refine Selection

An option that is hidden away in Photoshop, is the ‘Refine Selection’ button which allows you to quickly & accurately fine tune your selections. After creating a selection, look for a button at the top of Photoshop that says “Refine Selection”. This will open up a box with many sliding variables along with an option to see your selection on a variety of different coloured backgrounds. This is very useful when an accurate clipping is needed in InDesign or any application for that matter.
Grouping & Naming Layers
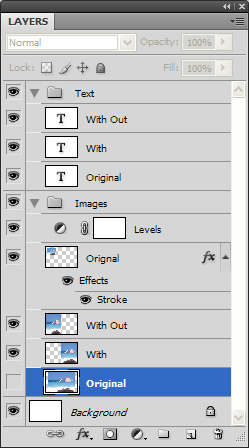
To ensure that you can quickly & easily modify the images in your InDesign layout (without having to go back to Photoshop) you should ensure that you name & organise your layers appropriately in accordance to what makes sense for your project. The order of which you organise your layers is very important as a group can have a pass-through blend applied, which affects every layer in the group or only those that you individually adjusted. To group the layers, select the layers you wish to group, then drag them to the Folder icon at the bottom of the Layers panel. Drag the folders into the hierarchy as needed or group them into another folder for easy adjustment straight in InDesign.
Quick Copy Merged + Paste
If you are working on a document that uses a lot of images, you will find it quite time consuming to constantly save and place your separate images into InDesign. A quick trick around that is to simply Select All (Ctrl+A), Copy Merged (Shift+Ctrl+C) and then Paste (Ctrl+V) the image straight into InDesign (or any other CS program). This trick should only be done for quick, easy jobs and it is not recommended to be used on large documents as it adds to the file size and does not allow for easy editing & linking. Again, use for quick and small jobs only.
No comments:
Post a Comment