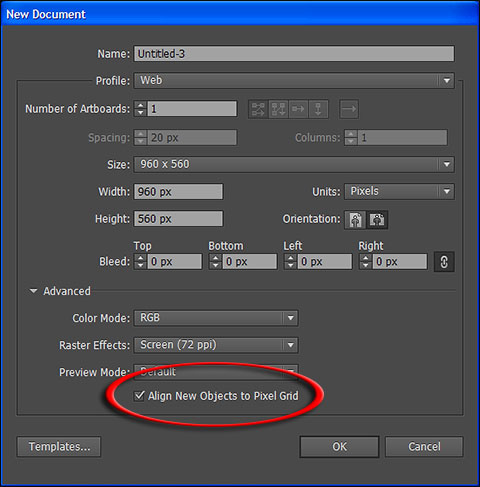
New Document window in Adobe Illustrator
But this option is not default for all presets you may use as starting point. Lets say you did not pay attention on this option and you have bunch of objects not aligned to pixel grid but you want them aligned because final destination of file is Web.
Why to align objects to pixel grid
Reason to have objects aligned to pixel grid is because when converting artwork to square pixels for Web you may end up with some semi-transparent pixels at the edge of object or shape. If you are not aware of how things works here is quick explanation: one pixel can have only one color or one level of transparency at the time. All pixels are identical or with exact same size. Illustrator allows you to draw shape anywhere with any size what can result that shape boundary falls on middle of pixel for example.
Always pay attention and on shape dimensions, do not draw shapes with dimensions which have (.) point something dimension like 320.5px etc because that something must become whole pixel. To check shape size select it then open Window > Transform panel and check W and H on the right side of panel. This is also very important when you are planning to share paths or shapes between Illustrator and Photoshop. Good news is that Align to Pixel Grid will solve this problem. In some of the next tutorials I will cover new and improved shape options in Photoshop.
Width and Height of selected object in Illustrator
When converting artwork to pixels no one object or shape can have half of pixel but whole pixel only, Illustrator will use anti-aliasing method to fill that area. In case mentioned above because boundary of object falls onto half of pixel (either because not aligned to pixel grid or because size of 320.5px), shape will be extended to cover that pixel and color of that pixel will be filled with same color but somewhat transparent, in this particular case - 50% because as mentioned shape boundry falls onto half of pixel or in other words at 50%. Anti-aliasing works in this way: if shape boundry (path) falls onto one third of pixel (30%) then when converting to pixels that shape will be extended to cover whole pixel and filled with same color but opaque 30% or in other words transparent 70% (same percentage of what drawn shape covers problematic pixel). Note: you will always have anti-aliasing applied for circles, ellipses, curved and diagonal lines.
Shape in Illustrator not aligned to pixel grid
How to align all objects to pixel grid
To quickly fix this problem with not aligned to pixel grid for all objects in document Adobe Illustrator offers wonderful command from Select menu. You do not need any object selected, just go to Select > Object > Not Aligned to Pixel Grid and Illustrator will select all object that are not aligned properly.
Not Aligned to Pixel Grid command in Adobe Illustrator
When you have all objects selected click on Transform link on Options bar to appear pop-up window and check Align to pixel grid option. That’s it, you have aligned all shapes or objects to pixel grid.
Align all selected objects to pixel grid in Adobe Illustrator
http://adobephotoshopsecrets.blogspot.com/2012/09/when-why-and-how-to-align-all-objects.html
1 comment:
Amazing, this is a great article, Clipping Path Associate, is one of the best clipping path
service providers around the world.
Post a Comment